

Wedding Day Guide from a Melbourne Wedding Photographer – Smooth Planning
Many brides ask me, “How can we make our wedding day run smoothly and still get great photos?” They don’t want to repeat the same mistakes they’ve seen at friends’ weddings — missing important family photos, dealing with unexpected weather, or falling far behind schedule.
I’m Nick, a full-time Melbourne wedding photographer since 2020. I photograph around 70–80 weddings each year. In addition, as a data curator at Tree Studio, I have access to a large archive of real wedding galleries photographed by different professionals. This gives me a broader, behind-the-scenes understanding of what truly happens on a wedding day — what matters most to couples and their families, and which small details are often overlooked but later become regrets.
Even though I always have a pre-wedding meeting with my couples about a month before the wedding, there are still many important details that can’t be fully absorbed in one conversation. If too much information is shared at once, couples can feel overwhelmed and even more anxious. Simply put, it’s impossible to digest everything in a single meeting.
That’s why I decided to write this complete wedding day guide — to help couples understand how to prepare, what to prioritise, and how to feel confident in their planning, all from a wedding photographer’s perspective.
This guide brings together the core ideas from my other resources, including wedding photography checklists and wedding day timelines, combined with my five years of hands-on experience photographing weddings. The goal is to create a comprehensive, practical guide for couples who want a well-organised, stress-free wedding day.
I recommend reading this guide when you first start planning your wedding, ideally 6–12 months in advance. It includes many fine details that will become clearer each time you revisit it. During our pre-wedding meeting, I’ll then highlight and reinforce the most important points, so everything feels calm, organised, and achievable.
Table of Contents
Groom Preparation Photography
What to Expect & How to Get the Best Photos Groom Preparation
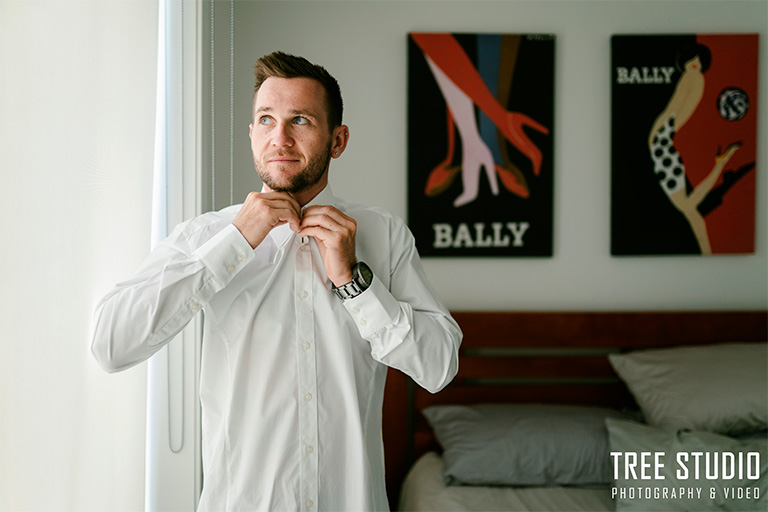
Wedding photography usually begins with the groom’s preparation. In most weddings, the groom arrives at the ceremony earlier than the bride, while the bride and bridesmaids often require more time for hair and makeup.
There are a few logistical exceptions. For example, the bride may be getting ready far from the ceremony venue while the groom stays nearby, or the groom may be preparing at the ceremony venue itself. In these cases, the timeline may be too tight for the photographer to travel back and forth.
However, for the majority of weddings, starting with groom preparation is the most efficient and stress-free approach.
Before the photographer arrives, I recommend preparing the following in advance:
- Tidy the room the day before the wedding
- Shower and get ready early (not joking — I’ve photographed groom preparations where groomsmen returned from a golf course and lined up for the bathroom)
- Wear smart casual clothing before putting on your suit
- Gather all wedding accessories and place them neatly on a table, tray, or clean surface
Good preparation allows the photography to run smoothly and helps capture clean, natural images without unnecessary stress.
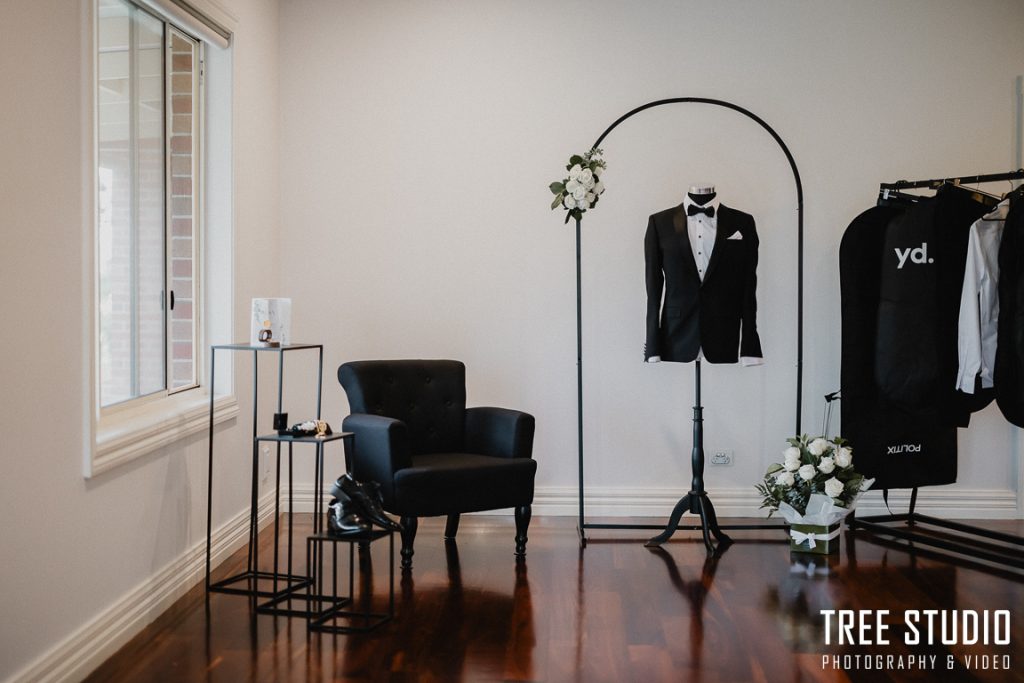
Groom Preparation Photography Checklist
If you’d like more detail, you can also refer to my separate blog post: Wedding Photography Checklist.
Accessories & Details:
- Wedding bands
- Suit on a wooden hanger or mannequin
- Shoes, belt, cufflinks
- Tie or bow tie, pocket square
- Watch, perfume
- Invitation card
- Gifts from the bride and gifts for groomsmen
- Sunglasses, cigar, flask
- Cultural items (e.g., Greek crown, traditional jewellery)
Moments to Capture:
- Hair styling or shaving (professional barber if arranged)
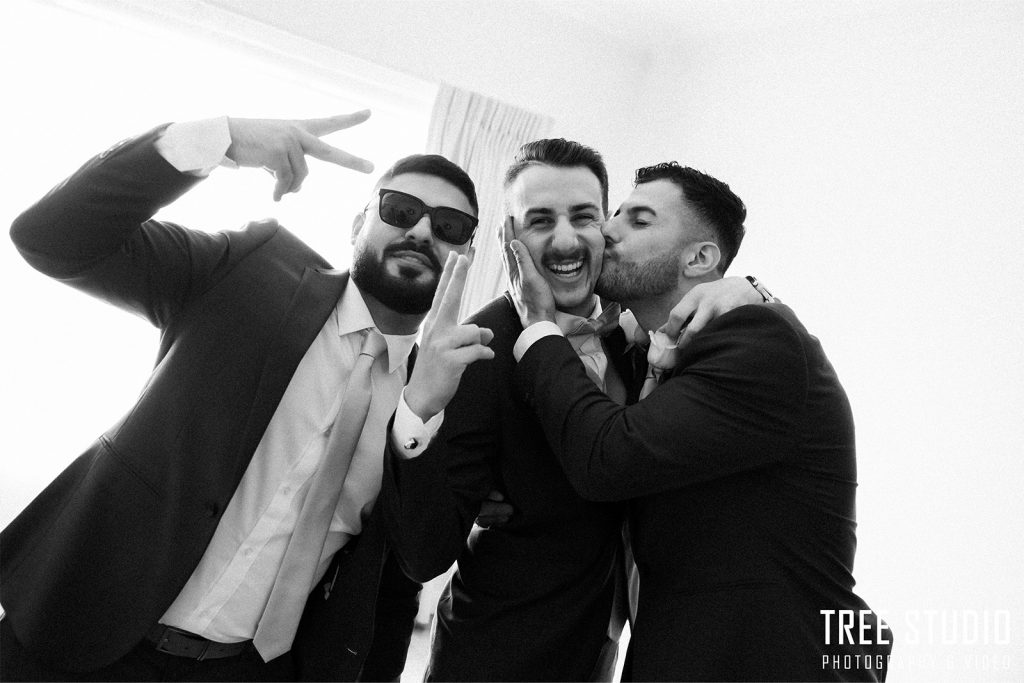
- Relaxed, candid moments with groomsmen (beer, whisky, chatting outdoors)
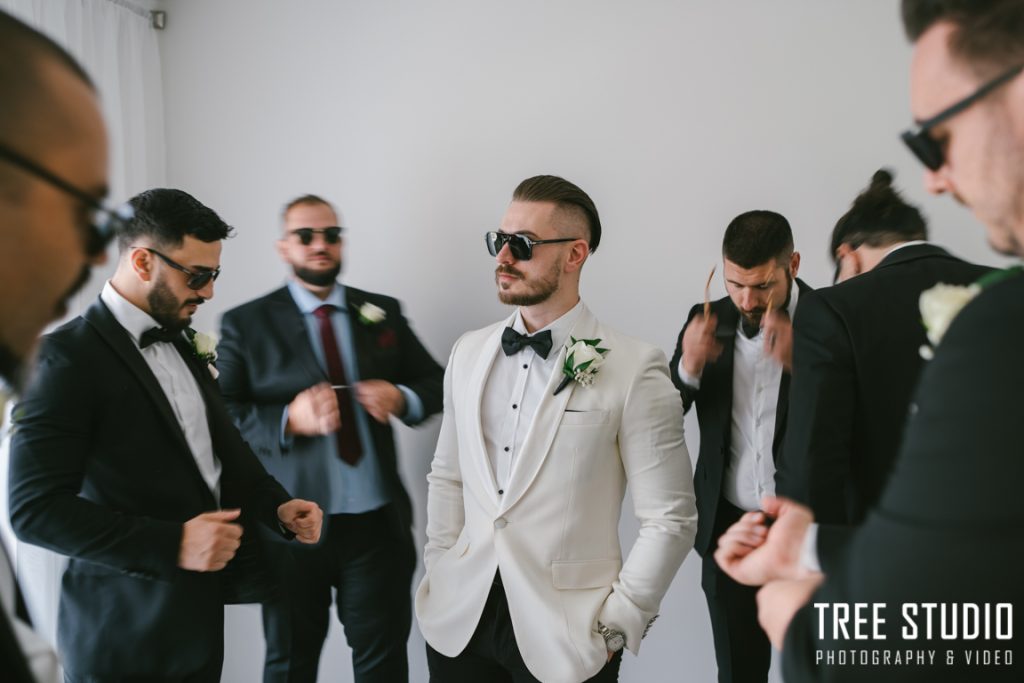
- Best man and groomsmen helping the groom dress
- Opening gifts and reading a letter from the bride
- Groom portraits once fully dressed
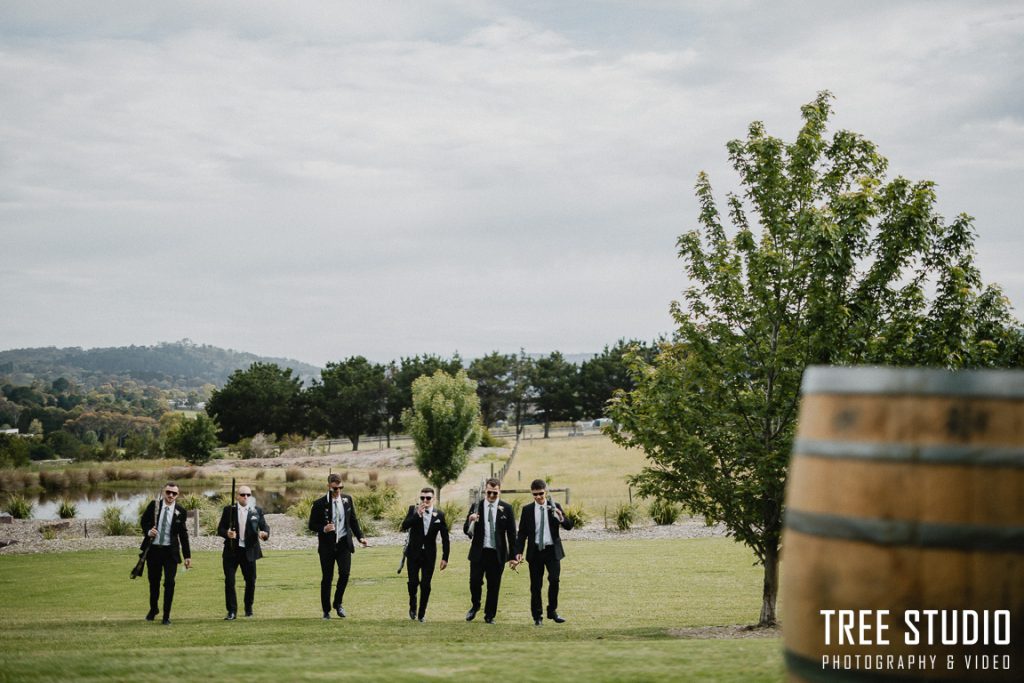
- Group photos with groomsmen
- Pinning the buttonhole
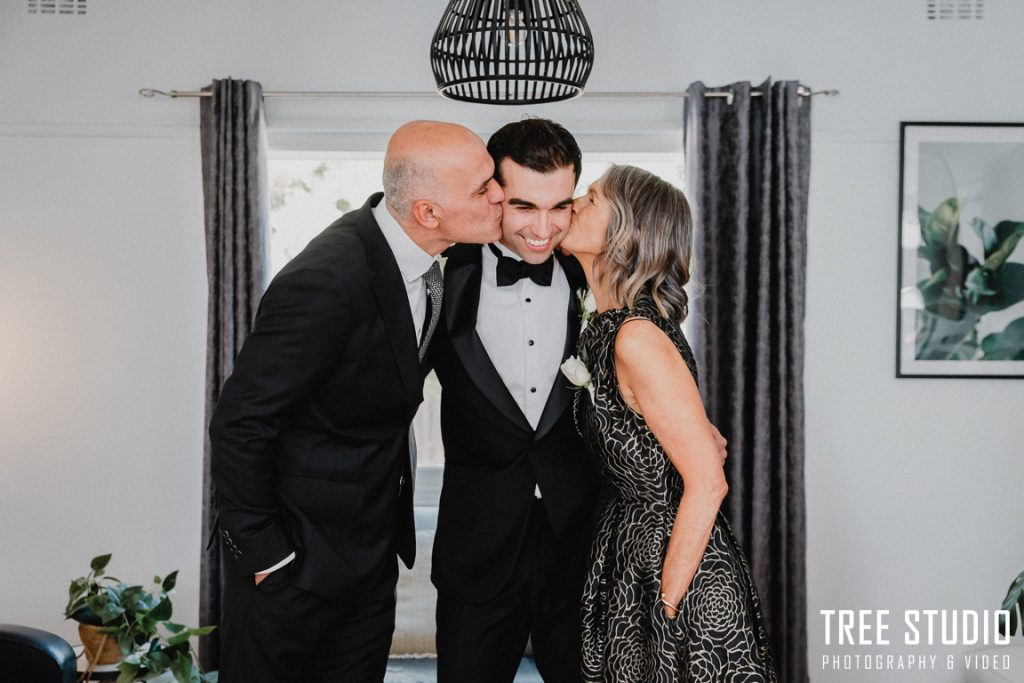
- Family photos with parents, siblings, and grandparents
- Photos with pets
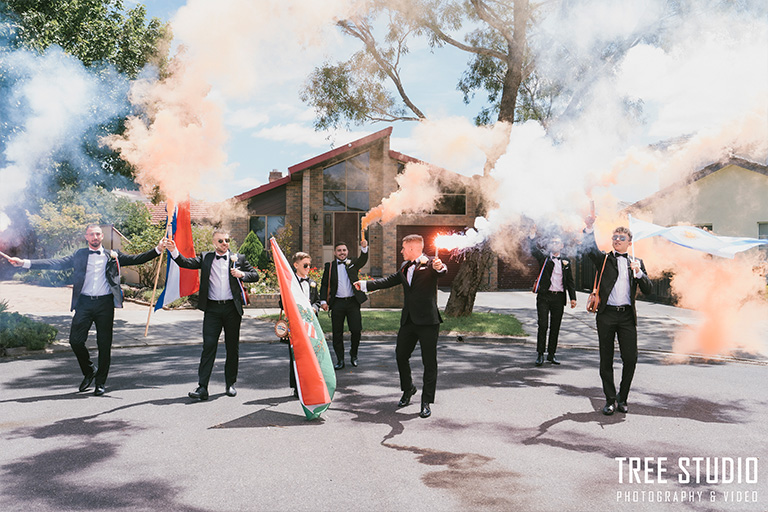
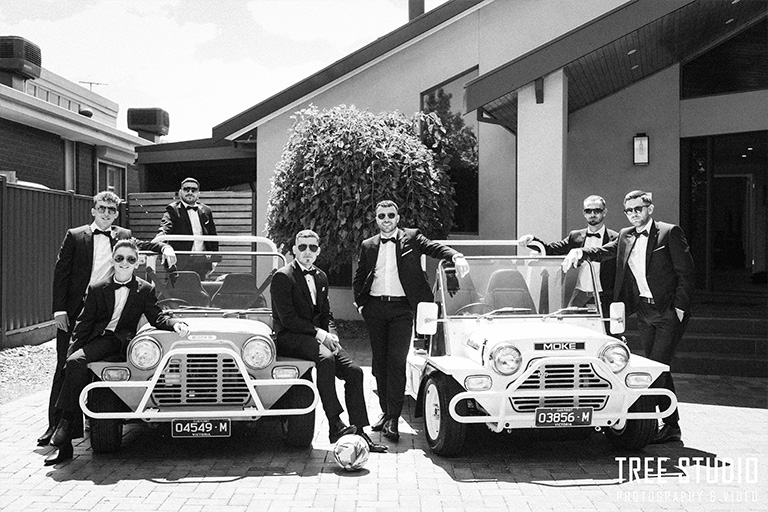
- Lifestyle elements that reflect the groom (motorbike, sports car, golf, footy, horse, cigar)
- Leaving the house (if time allows)
- Cultural traditions (e.g., drumming, Macedonian dance, live folk music)
Pro Tips for Groom Preparation Photos
- Allocate a minimum of 60 minutes for groom preparation; allow 90–120 minutes if cultural traditions or extended family photos are involved
- Finish showering and wear a casual shirt before the photographer arrives
- Tidy the room and gather all accessories in one place
- Add simple décor to the getting-ready room to reflect your personal style
- A full-length mirror and mannequin can elevate your photos significantly
- Groomsmen can wear the same suit colour but vary the tie or buttonhole so the groom stands out
- Choose a room with floor-to-ceiling windows if possible; clear furniture near the window for portraits
- Learn how to tie a tie and fold a pocket square before the wedding day — it takes longer than expected
- Parents should be dressed 30 minutes before the groom leaves the house
Timing Guide for Groom Preparation Photography
Total time: 1–1.5 hours
- Accessories & details: 10–15 minutes
- Gifts & letter: 5–10 minutes
- Candid and relaxing photos with groomsmen: 10–15 minutes
- Groom getting dressed: 10–15 minutes
- Groom portraits: 10–15 minutes
- Family photos: 10–15 minutes
- Traditions: extra time as requested
Why Groom Preparation Photos Are So Important
This is the very beginning of your wedding day. A relaxed and positive start helps ease pre-wedding nerves and allows the groom to warm up in front of the camera.
Many of the most meaningful moments happen here — opening a gift from the bride, reading a handwritten letter, receiving blessings from parents. These moments are real, emotional, and cannot be recreated after the day.
How to Get Great Groom Preparation Photos
Time always moves faster on a wedding day. If you want your photos to feel effortless and unforced, one hour is the absolute minimum. If you include traditions, cultural rituals, or a grand departure with motorbikes or sports cars, you’ll need extra time.
You don’t need to force a big smile. A calm, confident expression often creates timeless, editorial-style portraits.
If you’re athletic and want to show your best shape, good posture makes a huge difference. A few months of gym training before the wedding can noticeably improve your groom preparation photos.
What Happens During Groom Getting Ready
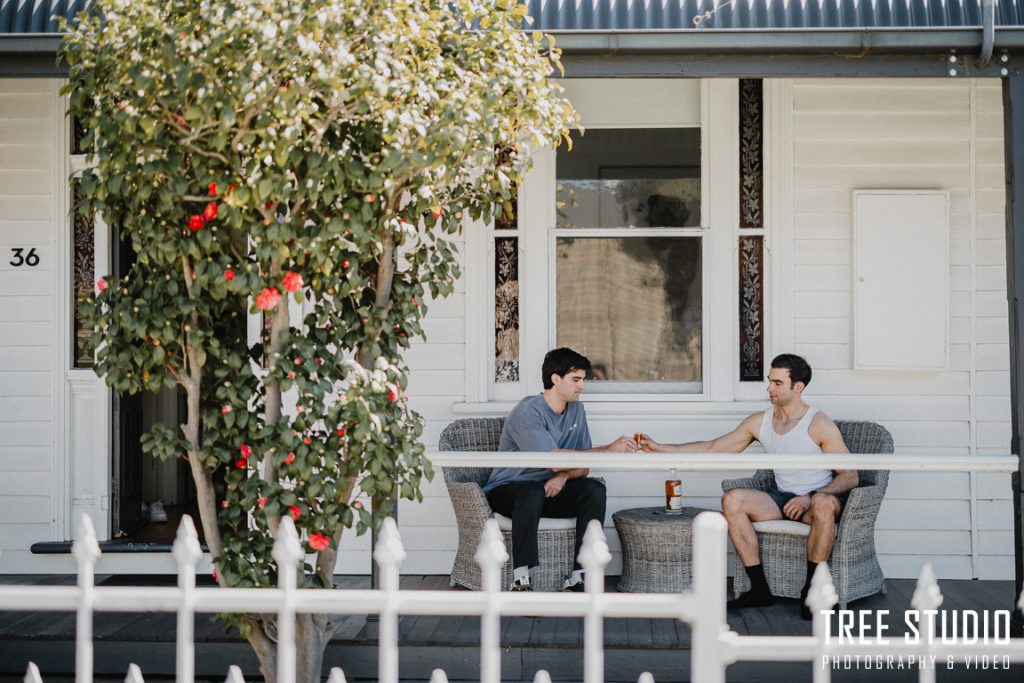
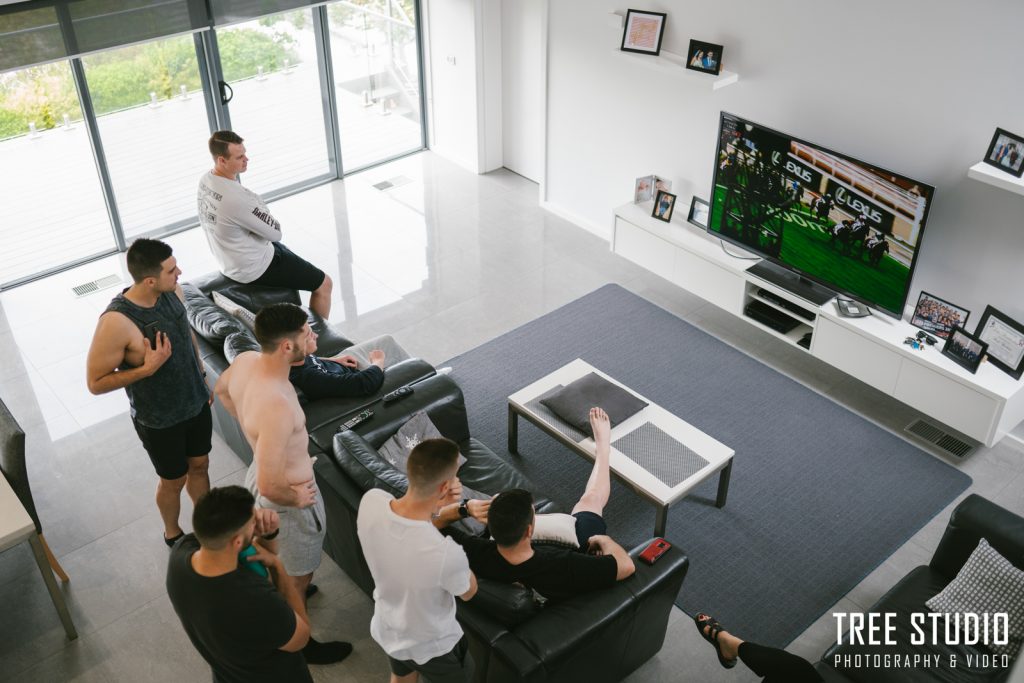
Relax — it’s just wedding preparation. Keep everyone in casual clothing before things become formal. Have a beer or whisky, spend time outdoors if the weather allows, play footy, golf, or simply chat. This relaxed environment helps everyone settle and allows your photographer to capture natural, candid moments.
Typical moments include:
- Groom and groomsmen having fun
- Toasting together
- Photos with pets
- Ironing shirts
- Organising accessories
Groom & Groomsmen Dressing
Before photographing the boys getting dressed, I’ll assess the room for good light and clean backdrops. Bags, rubbish, water bottles, snacks, and TVs should be removed or turned off.
Groomsmen can change into shirts and trousers in separate rooms, then help each other with ties, cufflinks, and jackets.
Common moments captured:
- Putting on socks, shoes, cufflinks
- Parents helping with tie or buttonhole
Groom Portraits & Group Photos
Once fully dressed, we take individual groom portraits — adjusting cufflinks, checking the mirror, and refining details.
Depending on weather and style, portraits can be taken indoors or outdoors. Group portraits with groomsmen can be done at this stage or after the ceremony if time is short.
Family Photos
Family plays a crucial role on the wedding day. I recommend taking a small number of family photos with parents and immediate family before leaving for the ceremony. A full formal family session will usually take place after the ceremony.
When Should the Photographer Arrive?
Ideally, 1–1.5 hours before the groom is ready to leave.
The groom and groomsmen should have finished showering and shaving but still be in casual clothing.
Groom Preparation with Cultural Traditions
Please let your photographer know in advance if you have cultural traditions such as shaving rituals, Macedonian dance, zafee drum playing, tea ceremonies, parade, lion dance, or picking up the bride. This allows us to estimate the extra time you need. These traditions are very important to certain communities.
Depending on the complexity, I recommend allowing an additional 30–60 minutes beyond standard groom preparation time.
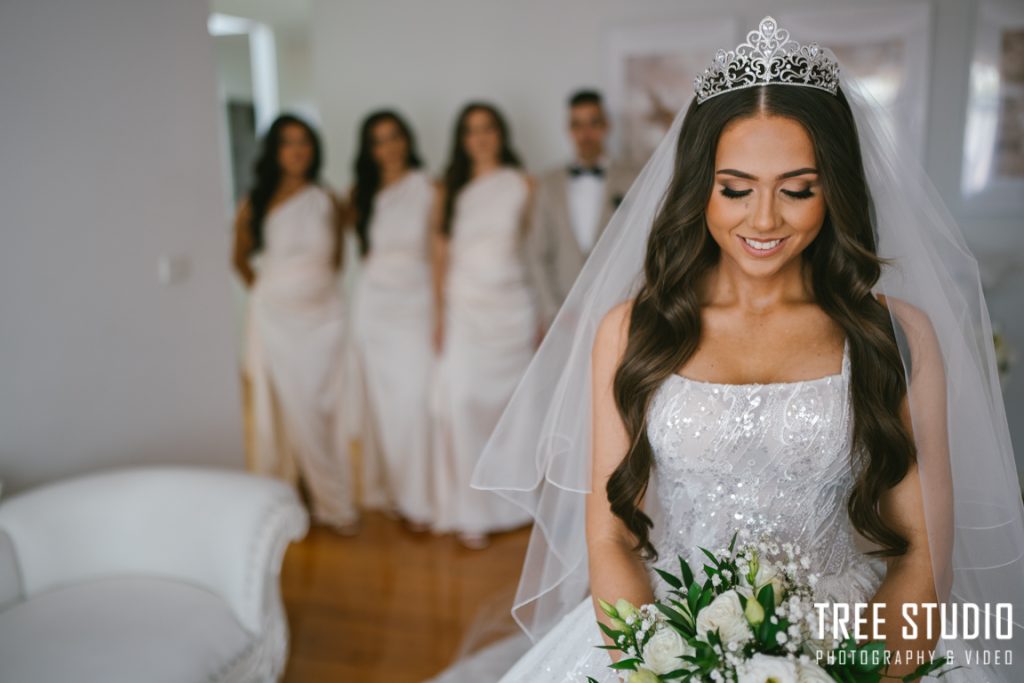
The Bride’s Morning
A Guide to an Elegant Bride Preparation
Once the groom’s preparation is complete, the photographer’s focus naturally shifts to the bride. While the groom’s session is often relaxed and candid, the bride’s morning is where true editorial storytelling begins.
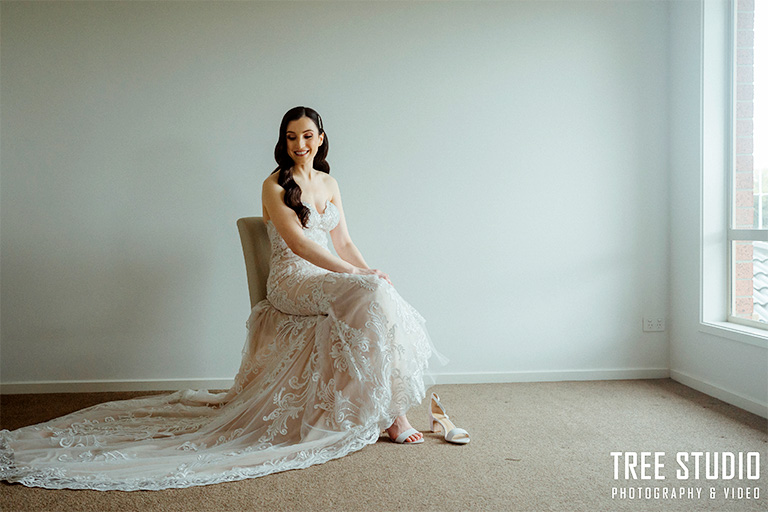
This is the time to capture refined details—the flowing gown, Cinderella shoes, jewellery, and sentimental keepsakes—in a timeless and elegant way. To achieve a high-end, effortless look, three elements are essential: preparation, space, and time.
Quick Tips for a Flawless Morning
- Allow enough time: We recommend a minimum of 1.5 hours for bride preparation photography.
- The “Ready Rule”: Hair and makeup should be fully completed before the photographer arrives.
- Choose the right space: A tidy, spacious room keeps the focus on you—not distractions.
- Posture matters: Practising good posture in the months leading up to the wedding makes a noticeable difference in your portraits.
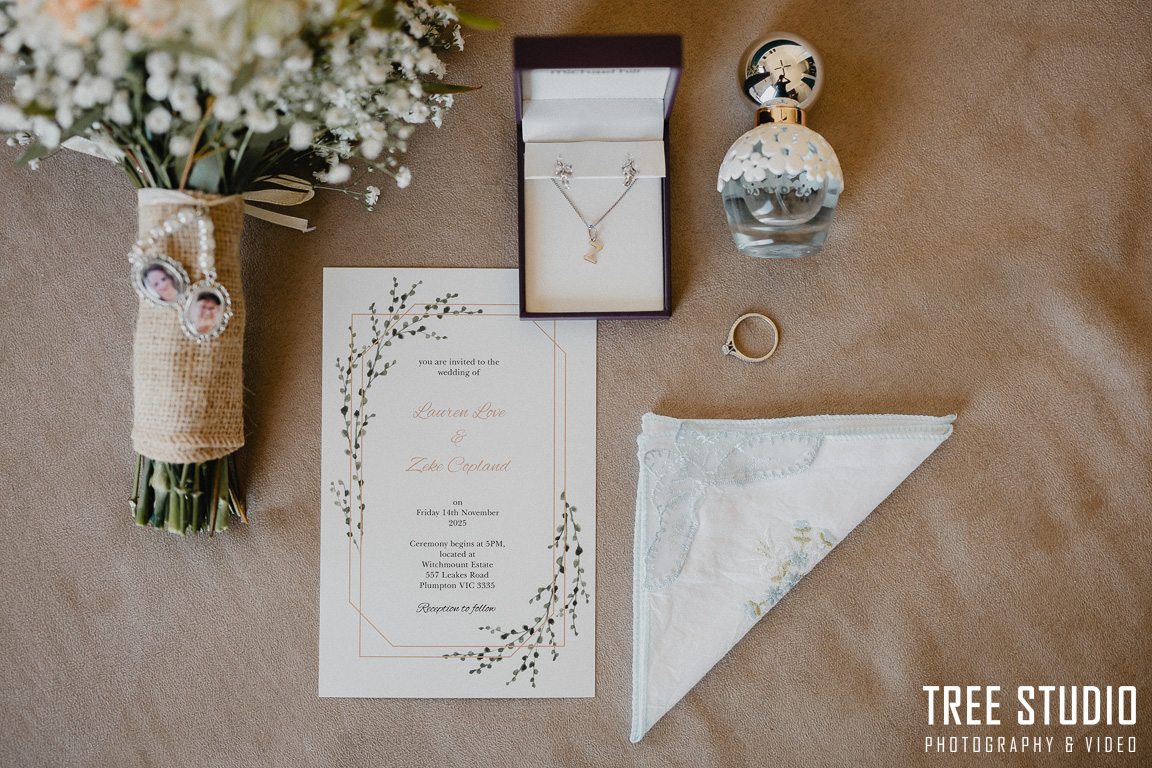
- Prepare your details: Gather all meaningful items—especially jewellery—in one place.
Before Your Photographer Arrives
The Beauty Buffer
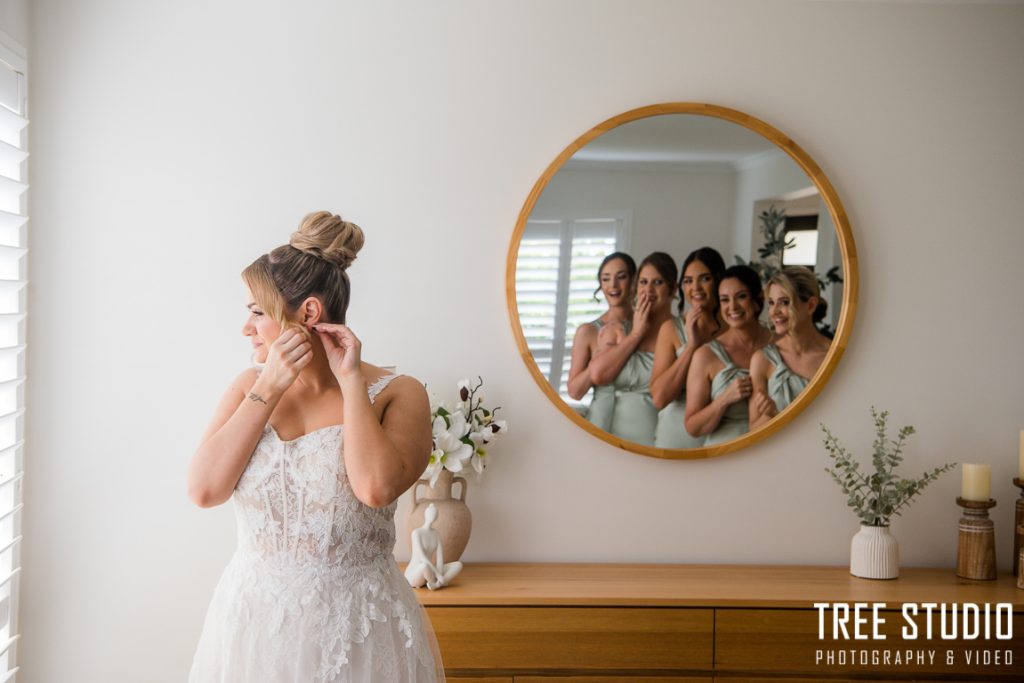
Ensure the bride, mother of the bride, and bridesmaids finish hair and makeup at least 30 minutes before the photographer arrives. This buffer allows for unexpected delays and keeps the atmosphere calm and unrushed.
It’s helpful for the Mother of the Bride or Maid of Honour to be ready first so they can assist with coordination while you enjoy your final touches.
Prepare the Canvas
Choose a room with the best natural light—usually a master bedroom or a spacious living area. Clear clutter and, if necessary, move furniture to create a clean, studio-like environment.
If you’re unsure which room works best, send a few photos to your photographer beforehand for professional advice.
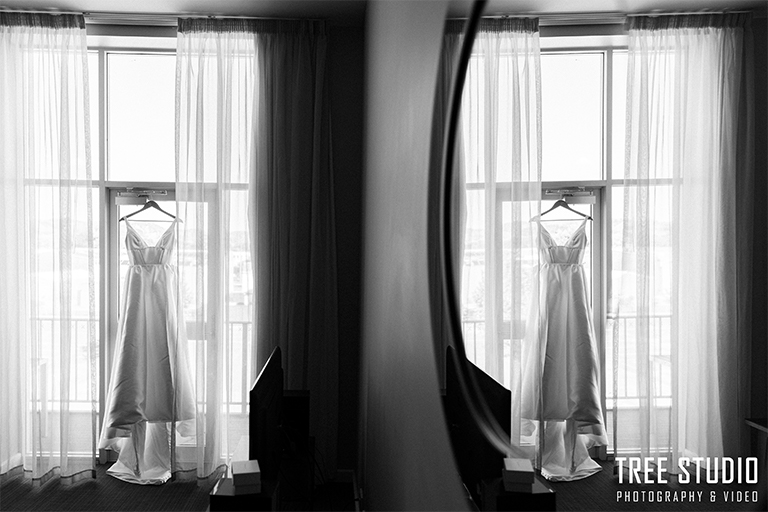
Curate Your Details
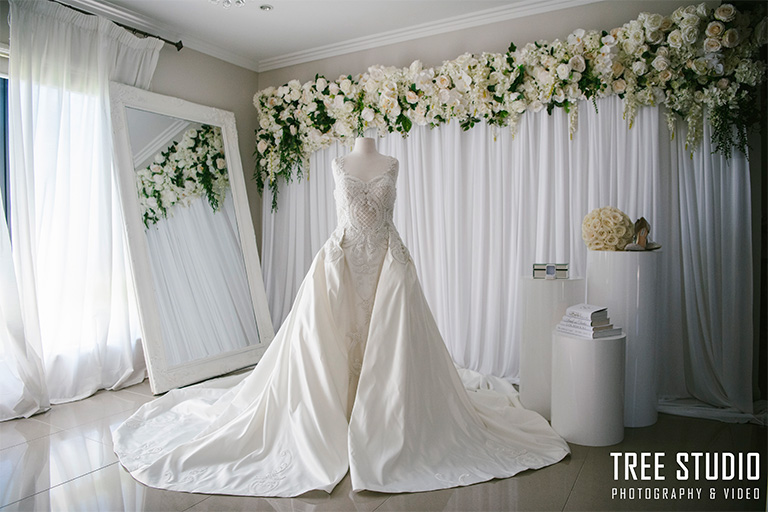
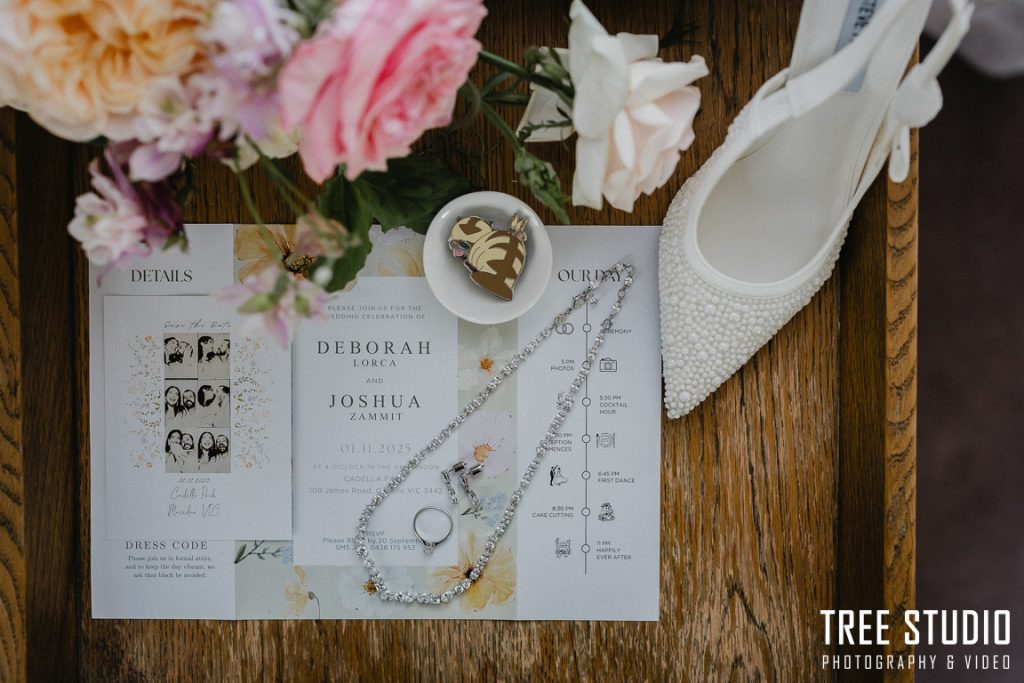
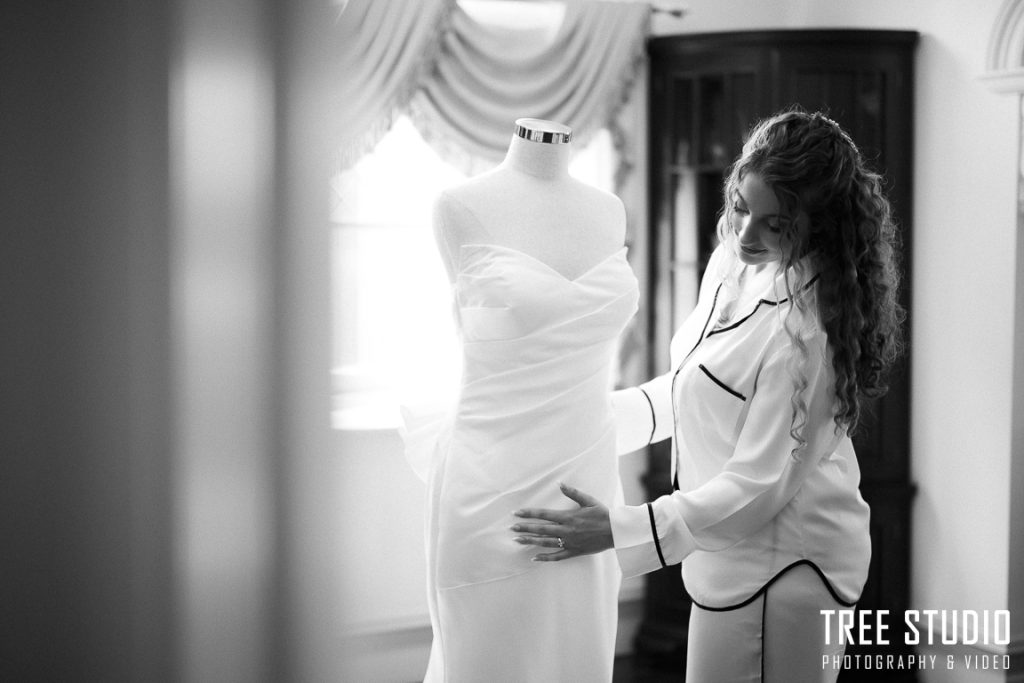
Gather your gown, shoes, perfume, invitation suite, jewellery, and bouquet in one room. For an editorial look, consider hanging your gown on a wooden hanger, mannequin, or stylish rack.
Having everything ready allows your photographer to begin immediately with elegant flat-lay and detail shots.
Coordinate the Inner Circle
If you plan to include extended family portraits at home, let everyone know the exact arrival time.
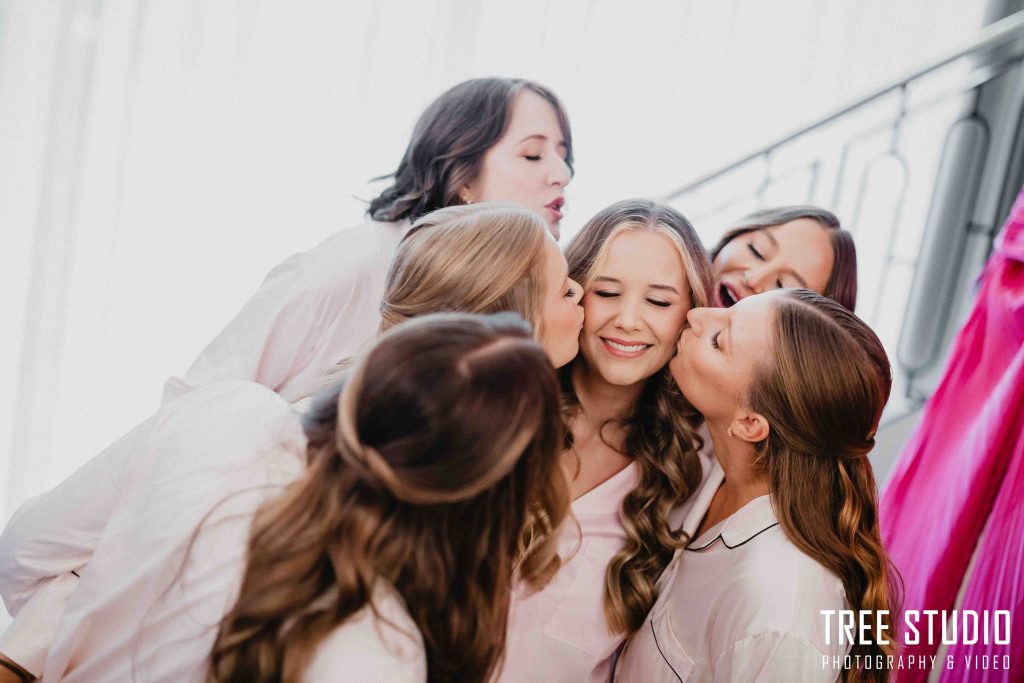
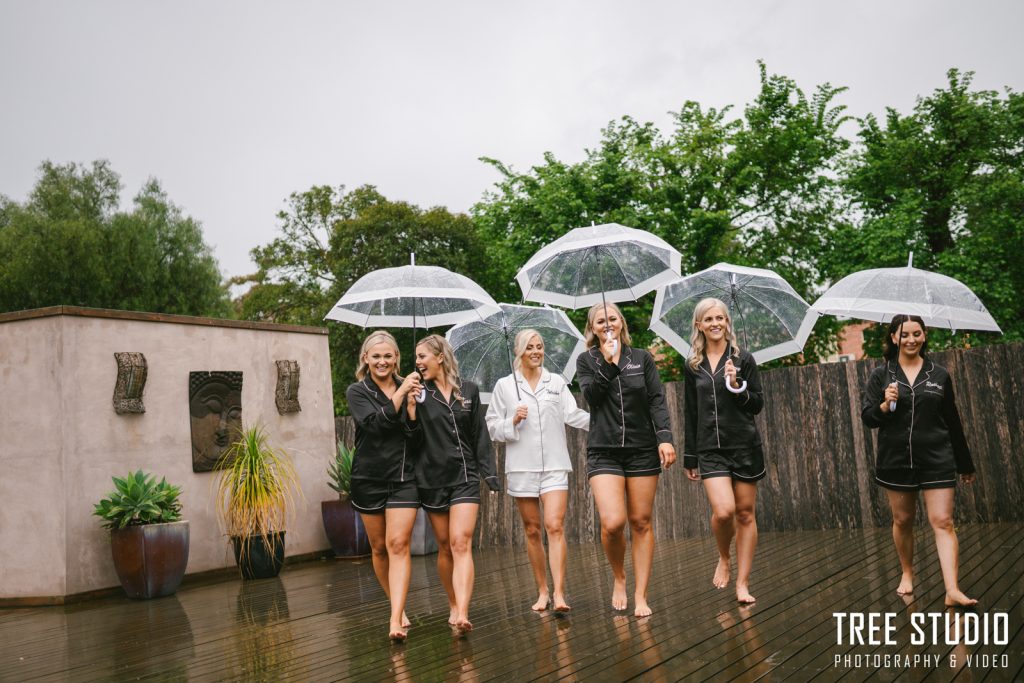
For cohesive “getting ready” images, ask bridesmaids to wear matching robes or pyjamas during the final preparation moments.
Bride Preparation Photography Checklist
Accessories & Details
- Wedding gown & veil
- Bridesmaid dresses
- Engagement & wedding rings (with ring box)
- Invitation suite
- Shoes (heels for photos + comfortable flats)
- Perfume
- Jewellery (earrings, necklace, bracelet, tiara, headpieces)
- Sunglasses & handbag
- Gifts
- Bouquet
Moments to Capture
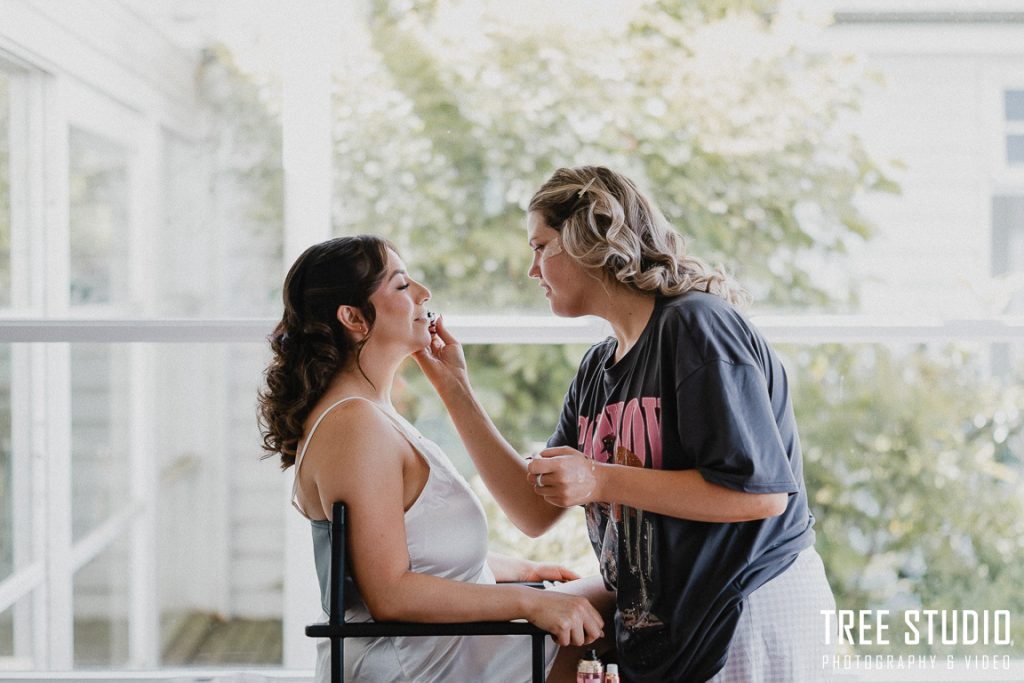
- Makeup touch-ups (with artist or mock touch-up by bridesmaid)
- Candid moments: laughing, chatting, bonding
- Reading a letter from the groom
- Photos with pets (before the dress is on)
- Opening champagne
- Robe photos with bridesmaids
- Bridesmaids helping the bride into her dress and shoes
- Father of the bride “first look”
- Mum placing the veil or jewellery
- Bride solo portraits
- Spraying perfume, putting on jewellery
- Bridesmaids fully dressed with the bride
- Giving gifts to bridesmaids
- Pinning the buttonhole
- Family portraits
- Cultural traditions (e.g. Zaffer escort, Macedonian dance)
- Bride leaving the house or stepping into the limousine (time permitting)
Pro Tips for Stunning Bride Preparation Photos
- Standard timing: 90 minutes; allow 2 hours if family or cultural traditions are involved.
- Finish hair and makeup 30 minutes before the photographer arrives.
- Choose a spacious, well-lit room—especially important for ball gowns or long trains.
- Use a quality wooden hanger or mannequin for an elevated look.
- Light posture-focused exercise (gym or Pilates, especially neck and shoulders) greatly improves portrait elegance.
- Wear luxury heels for photos only—bring flats for comfort.
- Ask bridesmaids to practise fastening your dress beforehand to save time.
- A full-length mirror that suits your wedding style adds depth and storytelling.
- Don’t stress about posing—your professional wedding photographer will guide you.
- If your home has a garden or pool, ensure it’s tidy for optional outdoor portraits.
- Parents should be dressed 30 minutes before departure for family photos.
- Being on time matters—but the bride is allowed a graceful 5–10 minute delay.
Timing Guide for Bride Preparation Photography
Total time: 1.5–2 hours
- Details & accessories: 10–15 minutes
- Candid moments: 10–15 minutes
- Champagne celebration: 5 minutes
- Changing into the gown: 10 minutes
- Bride portraits: 15–20 minutes
- Family photos: 10–15 minutes
- Cultural traditions: as required
What Matters Most for Bride Preparation Photos?
Finish Makeup on Time
One of the most common issues wedding photographers face is delayed hair and makeup. A slight delay of 5–10 minutes is manageable, but delays of 30–60 minutes force photographers into difficult decisions—rushing the bride, skipping moments, or delaying the ceremony.
Always plan a 30-minute buffer.
Organise Your Accessories
Arrange all personal items—especially small pieces like earrings, rings, and invitations—in one room. This avoids unnecessary stress and wasted time on your wedding morning.
Practise Getting Into the Dress
Dress designs vary greatly. A simple zip is quick, while a ballgown with corsets, ribbons, or bustles can take up to 30 minutes. Have bridesmaids practise beforehand so they’re familiar with the process.
Prepare Family Members
Ensure parents and key family members are dressed and ready 30 minutes before the bride leaves the house.
Outdoor Preparation
If you plan outdoor photos and have pets, ensure the garden is tidy and grass is trimmed.
How to Make Bride Preparation Look Glamorous & Elegant
You can find inspiration from wedding magazines such as Hello May or publications like Vogue. You don’t need to be a professional model—overthinking can create unnecessary pressure.
However, basic posture awareness makes a huge difference:
- Avoid rounded shoulders
- Keep your neck long and chin slightly forward
- These small adjustments naturally enhance elegance and reduce double chin appearance
With good posture, half the work is already done—your photographer will guide the rest.
Styling the Room
If you want a light, airy, and fresh look:
- Use light-coloured curtains to soften window light
- Move dark furniture out of frame
- Limit the room to no more than three main colours
Adding indoor plants (e.g. fiddle leaf fig, monstera) brings life and softness to photos and suits most wedding styles.
How Much Time Should You Allocate?
- Most weddings: 1.5 hours
- Short coverage: minimum 60 minutes
- Cultural traditions (e.g. Lebanese Zaffe): 2–2.5 hours
Vendors to Confirm for Bride Preparation
Ensure these vendors have your morning timeline and address:
- Makeup artist
- Hair stylist
- Wedding photographer
- Videographer
- Florist
For example, confirm the exact bouquet delivery time with your florist.
If you change your itinerary or location, contact vendors directly and confirm they’ve received the update.
Handling Unexpected Situations
- Forgot jewellery: Borrow from bridesmaids or have someone retrieve it later. Wear your preferred jewellery at the ceremony or photos—don’t pause the schedule for more than 5–10 minutes.
- Transport delay: If your chauffeur is stuck in traffic and cannot provide a clear arrival time, use an Uber or the photo car to avoid ceremony delays.
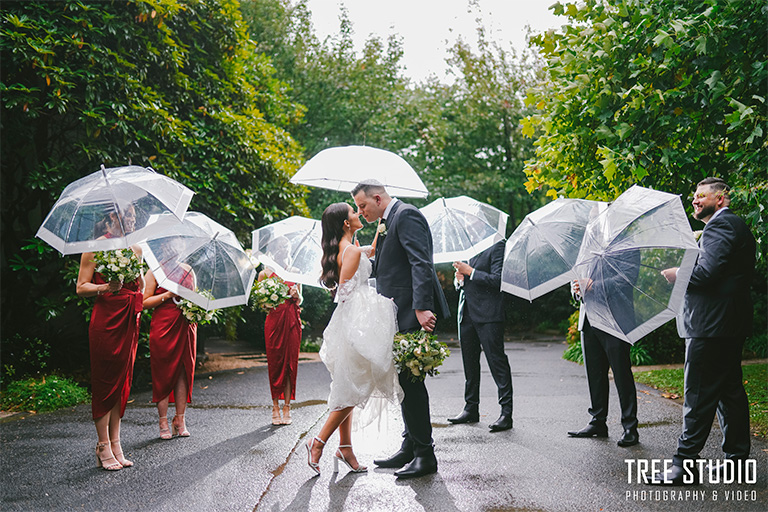
- Rain: Clear umbrellas work well for robe photos, but avoid outdoor photos in your wedding dress.
- Dark rooms: Ask your photographer to bring external lighting or move to another room with better natural light.
Rule of thumb: Don’t let small issues affect your entire wedding day.
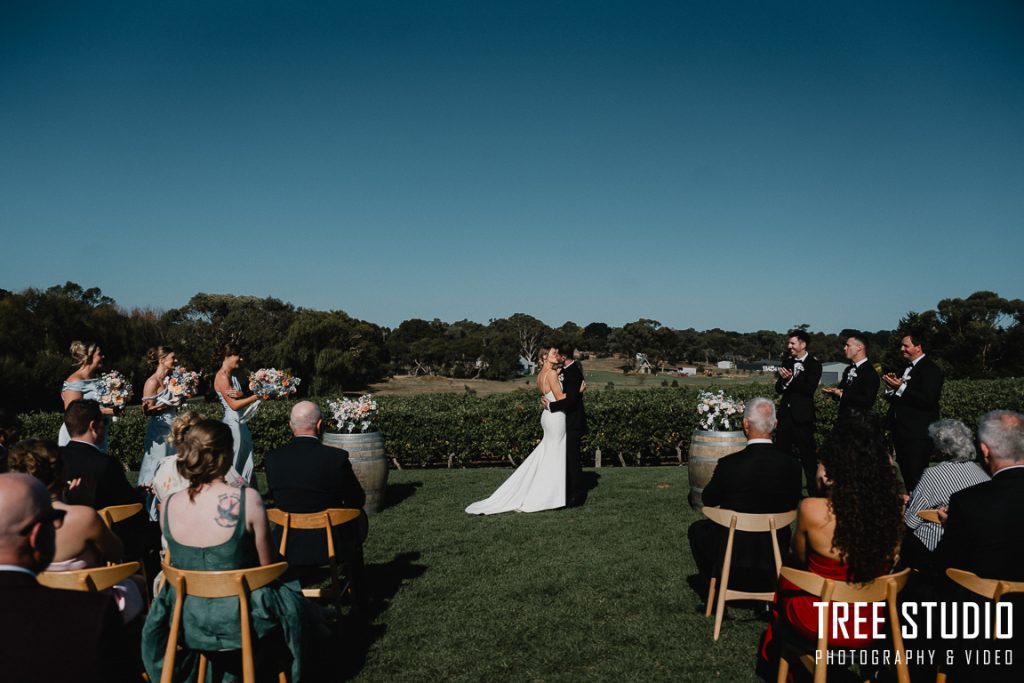
Wedding Ceremony Photography
During groom and bride preparation, the photographer plays multiple roles: participant, time manager, and guide—giving direction at key moments.
For the wedding ceremony, a professional wedding photographer adopts a documentary, photojournalistic approach, aiming to capture authentic emotions, tears, and unscripted moments while minimally interfering with the proceedings. Your genuine reactions and emotions are the focus, creating lively and heartfelt memories.
It’s important to note that during the ceremony, the photographer has very limited ability to direct you. Many moments cannot be repeated, so planning ahead and being aware of the schedule is essential.
Timing Tips:
- Summer weddings: Schedule the ceremony in the late afternoon. With daylight saving, sunset is later, leaving sufficient light for family and bridal party photos afterward.
- Winter weddings: Hold the ceremony earlier to avoid dark or poor lighting conditions.
Moments and Subjects to Photograph:
- Groom greeting guests
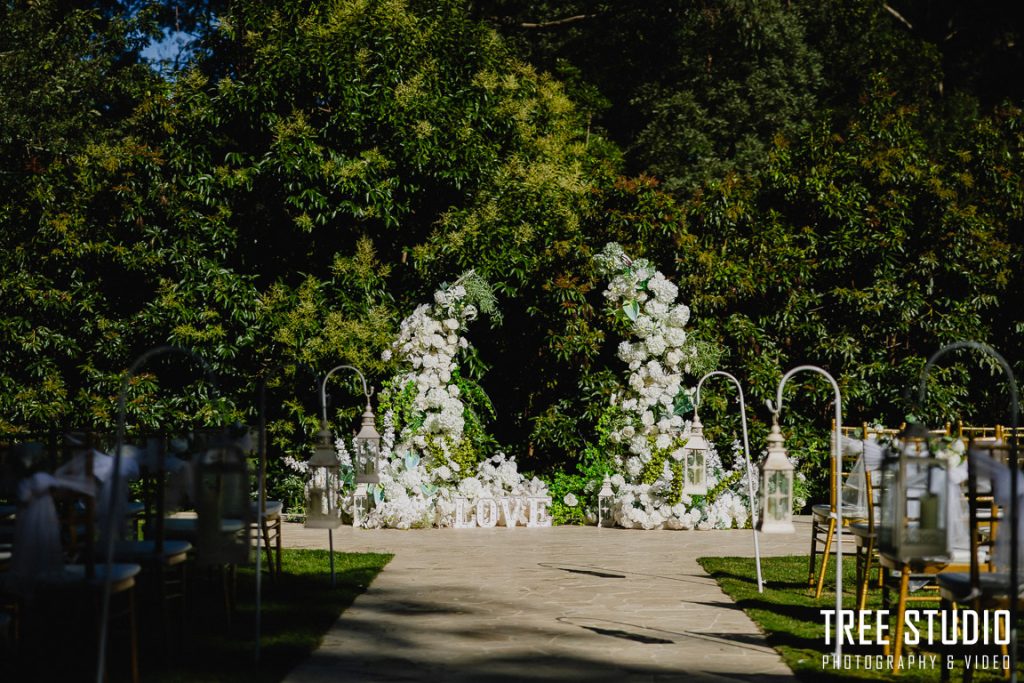
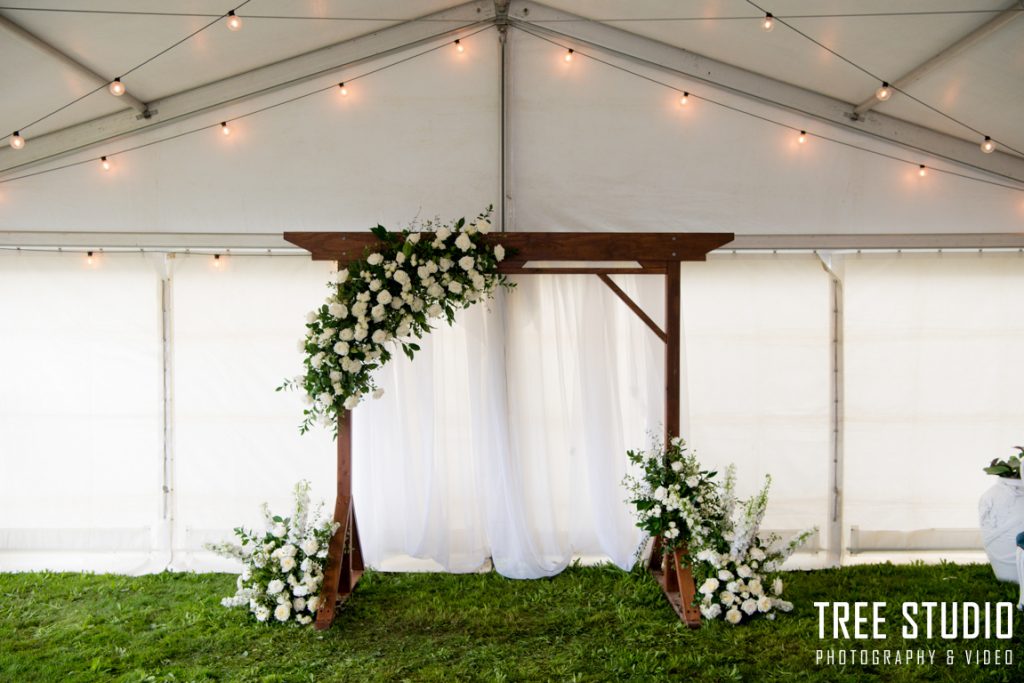
- Wedding arch, floral arrangements, and décor details
- Musicians (violinists, cellists, pianists, harpists, etc.)
- Guest mingling
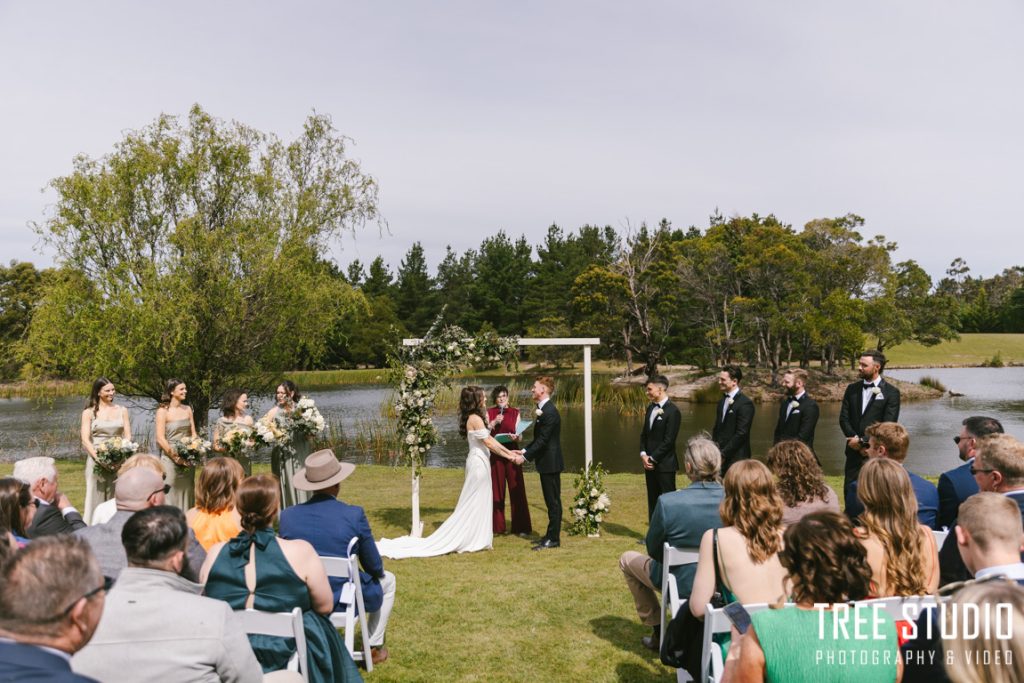
- Bride’s arrival and father walking the bride from the car to the altar
Tip: If only one photographer is hired, wait in the car until the arrival is captured - Flower girls, page boys, and bridesmaids walking down the aisle
- Bride holding her father’s arm walking to the altar
- Groom’s first look and reaction
- Celebrant or priest reading
- Cultural rituals (e.g., lighting candles, Sri Lankan drummers, other traditions)
- Reading vows and exchanging rings
- First kiss
- Signing the marriage certificate
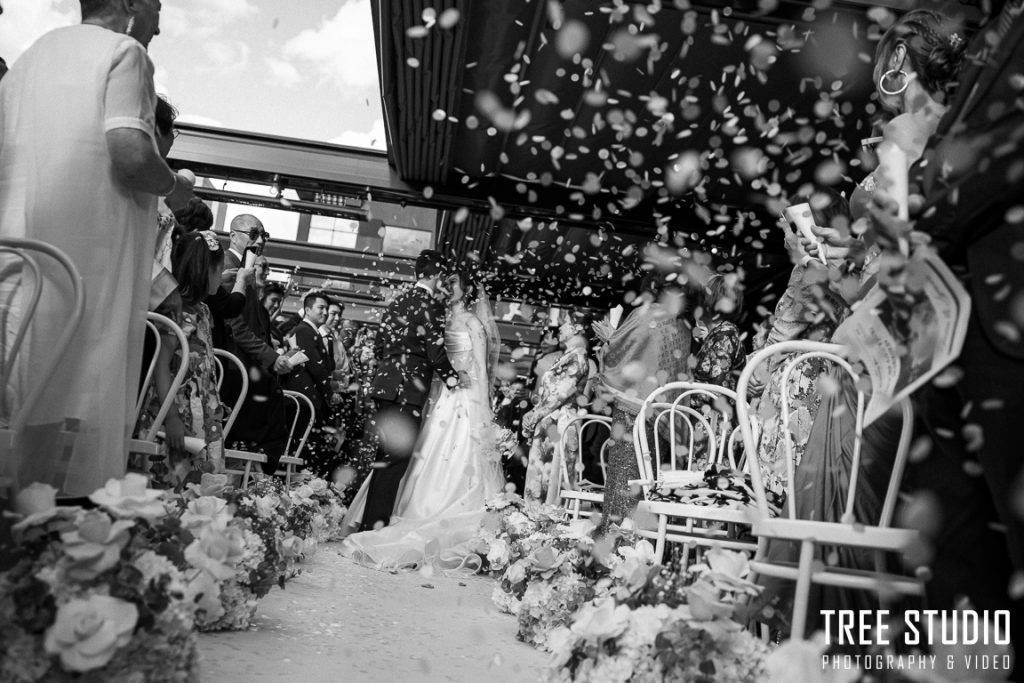
- Bride and groom walking down the aisle together
- Guests throwing flower petals, confetti, or rice (e.g., Greek traditions)
A professional photographer ensures these moments are captured naturally and beautifully, preserving the story of your day without interruption.
Pro Tips to Elevate Your Wedding Ceremony Photos
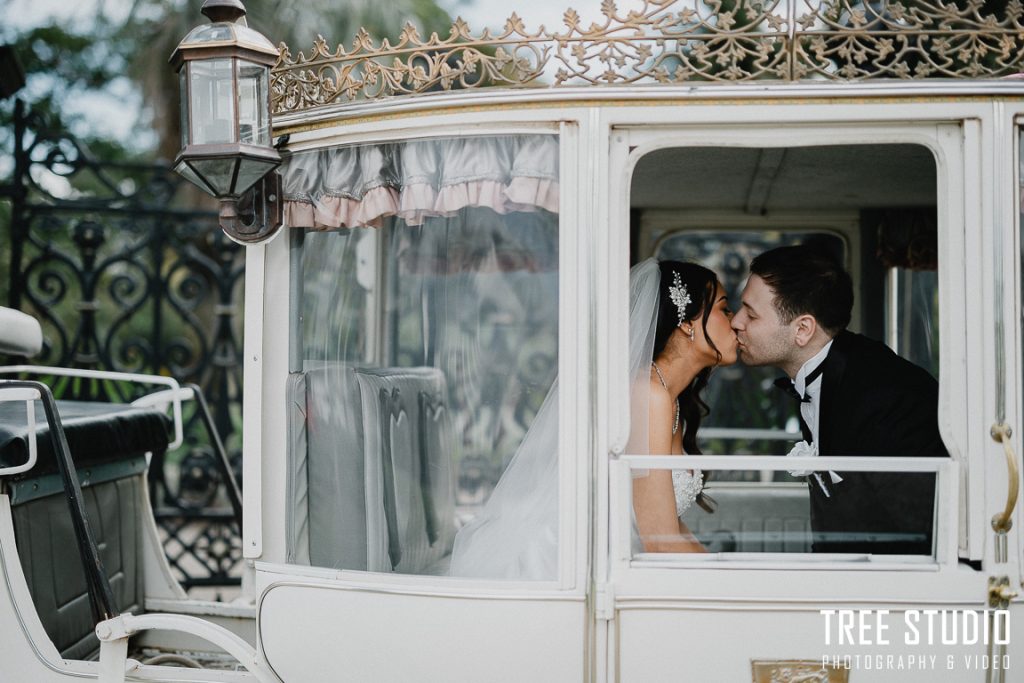
Bride’s Arrival
Many brides arrive in a limousine, vintage Rolls-Royce, or even a fairy-tale-style horse carriage. To capture this epic moment, we recommend staying inside the car until your wedding photographer is ready—sometimes the photographer may still be photographing inside the church or venue.
When you arrive, gently roll the window halfway down to let natural light in. Lean slightly toward the window and wait calmly for your father or chauffeur to open the door. This creates beautiful, candid images filled with anticipation and emotion.
Before stepping into the church or garden ceremony, ask a bridesmaid to quickly check your dress and train so it flows naturally.
Walking Down the Aisle
As rehearsed, the music will begin for the flower girls, page boys, bridesmaids, and bride. Take a deep breath—within the next minute, you will be the focal point of the entire ceremony.
Walk at a slow, relaxed pace and leave a generous gap between each person (ideally 5–10 metres). This spacing allows the photographer to capture each individual clearly and beautifully.
For an elevated perspective, some churches have balconies where musicians or organists perform. If a second photographer is booked, one can photograph from above, capturing a wide-angle view of the entire church as your long train flows down the aisle—an unforgettable, cinematic moment.

Wedding Ceremony Regulations and Lighting Conditions
Some churches and wedding venues in Melbourne have specific regulations that couples and photographers need to be aware of. For example:
- Certain churches allow only one photographer and one videographer inside during the ceremony.
- Some venues, such as St Patrick’s Cathedral, prohibit the use of flash during the service.
- Some priests are very strict about movement during the ceremony and may not allow photographers to move freely, as they want minimal interference with the proceedings.
- In Greek Orthodox churches, photographers are not allowed to step on the altar.
If your church or priest has clear rules, it’s important to inform your wedding photographer in advance. This helps avoid unnecessary stress or delays on the wedding day.
Lighting can also be a challenge in some venues. For example, Montsalvat and other older or more intimate venues can be quite dark. Discuss your photographer’s approach to lighting ahead of time so they can plan how to capture clean, crisp images while respecting the venue’s restrictions.
Proper planning ensures your wedding photos remain beautiful, regardless of rules or lighting conditions.
Backup Plan for Outdoor Wedding Ceremonies
Melbourne’s weather is famously unpredictable. If you are planning an outdoor wedding ceremony—for example at a winery, garden, or vineyard—it’s essential to have a backup plan in place.
Fortunately, many wedding venues such as Stones of Yarra Valley, Zonzo Estate, and Marnong Estate offer beautiful chapels or conservatories that can be used on rainy days.
Make sure your backup plan is confirmed well in advance and that your wedding photographer, as well as your guests, are informed of the alternative location. Without clear communication, guests may have trouble finding the backup venue, and your wedding day timeline could face significant delays.
Planning ahead ensures that rain won’t rain on your parade, and your photos and ceremony can proceed smoothly, no matter the weather.
Unplugged Wedding Ceremony
In today’s digital age, many guests instinctively reach for their phones or tablets to take photos during key moments, such as when the bride walks down the aisle. Imagine the wedding photographer standing beside the groom at the end of the aisle—if multiple guests are holding up phones, they can block the photographer’s view or even appear in your wedding images, creating unwanted distractions.
To avoid this, consider an unplugged wedding ceremony. You can ask your celebrant or priest to remind guests to put down their devices during the ceremony, giving your professional photographer full access to capture the day beautifully. This ensures the most important moments are preserved without interference.
First Kiss
The first kiss is one of the most important moments of your wedding day. In some venues, especially darker churches, cameras may take slightly longer to focus, making it crucial to hold the kiss a little longer.
For dramatic effect, grooms who want a cinematic first kiss—such as dipping the bride and holding her waist—should maintain the pose slightly longer. This gives your photographer the time to capture the perfect, unforgettable shot.
Flower Petals and Confetti
The couple’s exit is a joyful and memorable moment.
Natural flower petals are usually permitted at outdoor venues such as Royal Botanic Gardens Victoria and Carlton Gardens.
For church ceremonies, guests can gather outside and throw petals or confetti as the couple exits.
Tips:
- Guests should throw petals into the air, not directly at the couple
- Coordinated throwing creates vibrant, energetic images
- Rice throwing is traditional in some cultures, but may be difficult to remove from hair and clothing
FAQ – Wedding Ceremony Photography
Melbourne is a multicultural city, and many ceremonies include unique traditions.
Examples include:
- Greek Orthodox ceremonies
- Chinese and Vietnamese tea ceremonies
- Sri Lankan ceremonies with traditional drummers
Please inform your photographer of all traditions in advance.
Late arrivals can disrupt important moments such as the bride’s entrance.
Your coordinator or celebrant should guide late guests to enter quietly at an appropriate time.
Your photographer will prepare suitable equipment. However, some venues do not allow flash photography. Please inform your photographer of any restrictions in advance.
If you are planning an outdoor ceremony in locations such as the Yarra Valley, Dandenong Ranges, or Mornington Peninsula, the natural scenery—vineyards, gardens, and coastal views—can provide a stunning backdrop.
Lighting is extremely important, especially during summer. When planning your ceremony location, consider the sun’s position and avoid standing in direct sunlight, which can cause discomfort and squinting.
If possible, visit the venue at a similar time of day and season to choose the optimal ceremony position.
Melbourne’s weather can also be unpredictable, so it is essential to have a confirmed backup plan in case of rain or strong winds.
Your photographer should arrive at least 30 minutes before the ceremony to capture:
- Guest arrivals
- Venue and décor details
- Groom greeting guests
- Candid moments
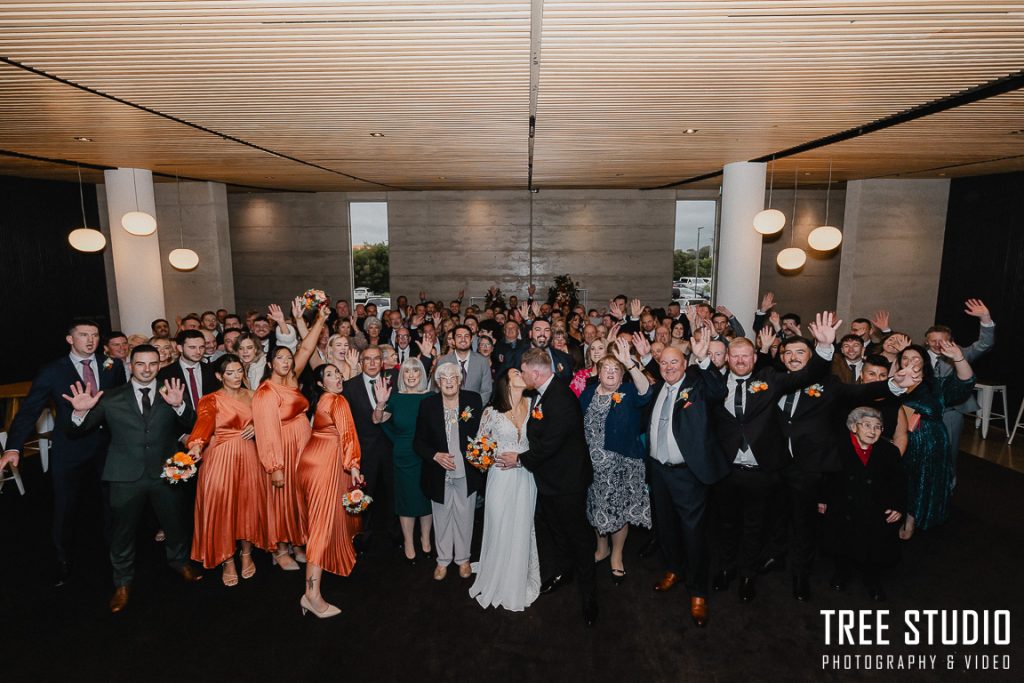
Family Photos
Family photos usually take place immediately after the ceremony. This is a very important task for the wedding photographer, and the bride and groom should organize the nominated groups from the family photo list to ensure everything runs smoothly. Many close family members will expect these photos, often valuing them even more than bridal portraits, so it’s essential to get great shots for your guests.
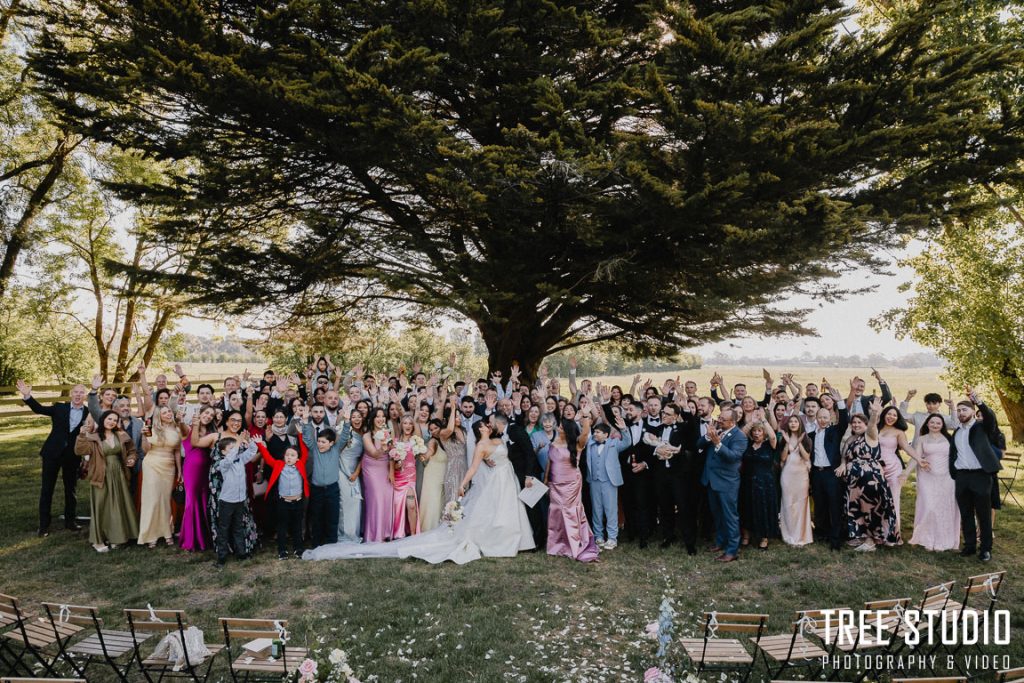
Where to Take Family Photos
As a rule of thumb, take family photos at the location of the ceremony. Avoid moving to different locations or waiting until the reception if possible. Changing locations often causes delays—family members may take time to travel, and traffic or parking issues can slow the process.
Sometimes couples postpone family photos to the reception, but if people disperse after the ceremony, it becomes very difficult to gather everyone from the family photo list at the same time. Sticking to the ceremony location is the most practical and efficient approach.
Who Organizes Family Photos
The bride and groom should prepare the family photo list and appoint someone—such as a parent, best man, or maid of honor—to call each group for their shots. The photographer cannot memorize all family members and some important people may only be present for the ceremony.
The wedding photographer will select the optimal spots for the photos and determine the best angles and lighting to ensure professional-quality results.
What to Be Aware Of
If there are amateur photographers among your guests, kindly ask them to let the professional photographer take the photos first. Multiple cameras being used simultaneously can confuse subjects and disrupt the session, so it’s important to manage this in advance.
Indoor or Outdoor Family Photos?
Ideally, take family photos outdoors. Natural backdrops, such as trees or clean walls, provide a beautiful setting, and outdoor lighting usually gives the photographer optimal conditions.
In some circumstances—such as busy streets outside St. Michael’s Uniting Church on Collins Street, or for very large groups—it may be necessary to take photos indoors. On rainy days, indoor photos are unavoidable, and the photographer may use external LED lights or flash, depending on their preference, to ensure high-quality images.
How Long Will It Take?
Family photos usually take about 30 minutes. If you have a large family photo list, want to mingle with guests afterward, or provide refreshments like high tea, the session can be extended. However, make sure to balance the timing if you still plan to take bridal party photos at multiple locations afterward.
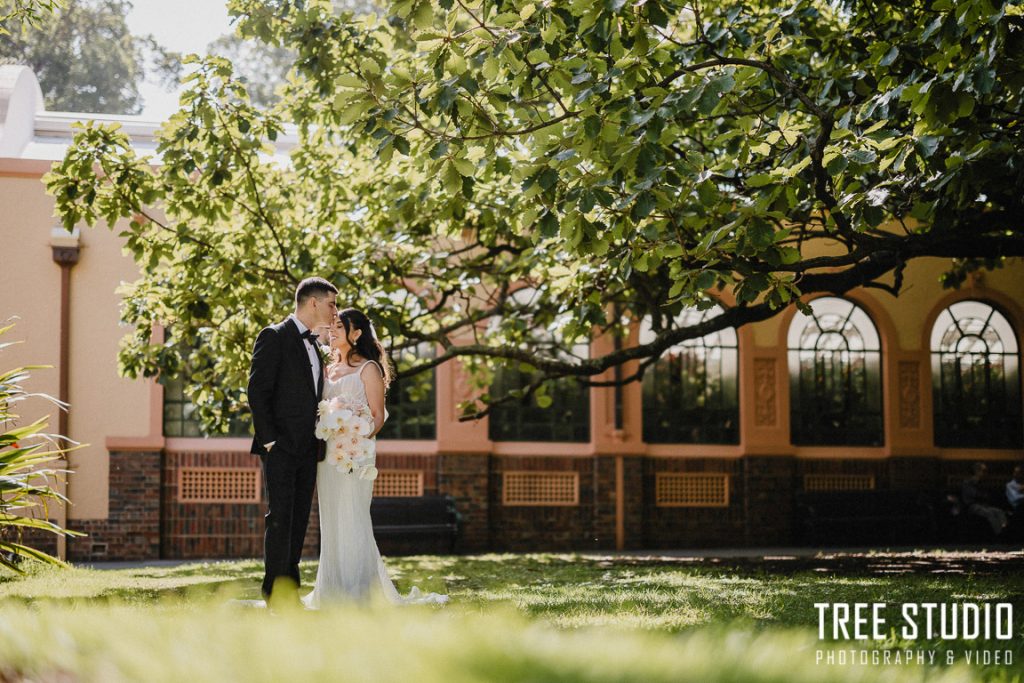
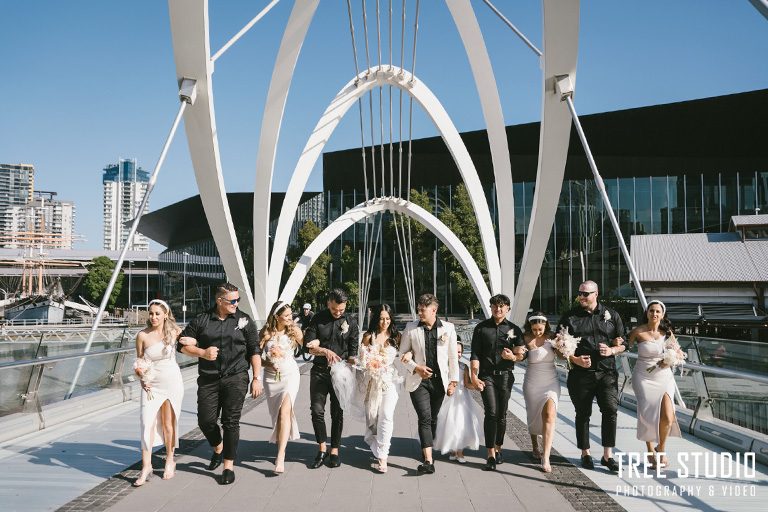
Wedding Photo Locations in Melbourne
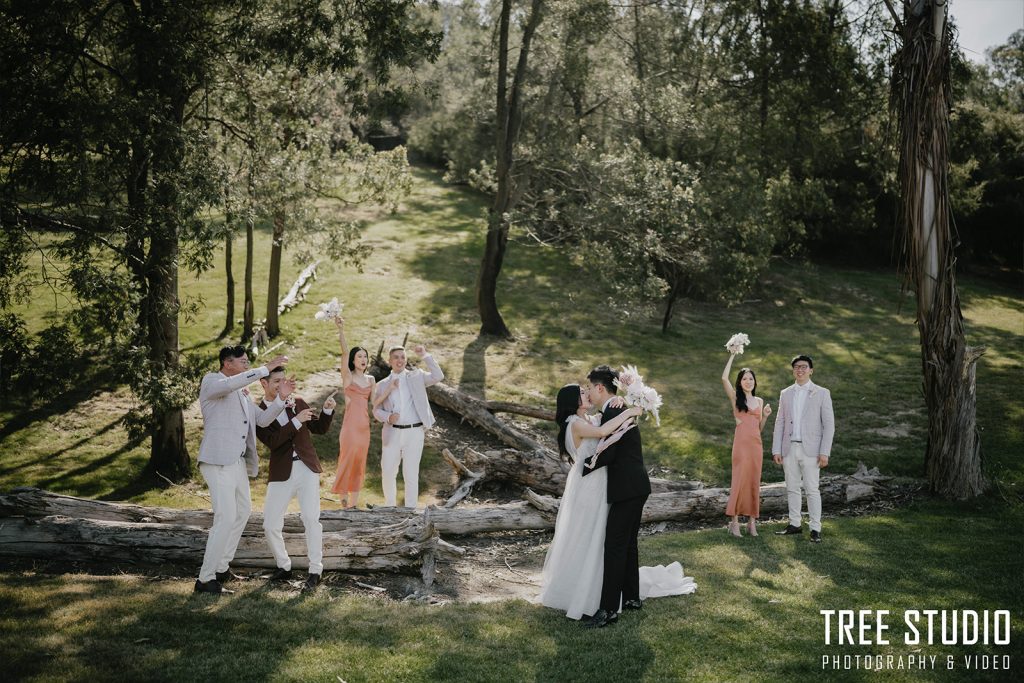
Choosing the right wedding photo location is an important part of planning your wedding day. In Melbourne, couples generally follow two common approaches when planning their bridal party and portrait photography.
Two Common Wedding Venue Scenarios
- All-in-One Wedding Venues
Some venues provide beautiful ceremony, reception, and photography locations all in one place. Popular examples include:
- Marnong Estate
- Stones of the Yarra Valley
- Tatra Receptions
- Montsalvat
- Rippon Lea Estate
These venues usually feature gardens, vineyards, historic architecture, and scenic landscapes, allowing couples to complete all photography on-site without additional travel.
This option is often more relaxed and time-efficient, especially for winter weddings when daylight is limited.
- Reception-Focused Venues
Other venues are designed primarily for receptions and may have fewer photographic settings nearby. Examples include:
- Metropolis Events
- Leonda By The Yarra
- Vogue Ballroom
- Manor on High
In these cases, couples often travel to Melbourne CBD or nearby areas for bridal party photos, where many iconic photo locations are close together.
How Much Time Should You Allocate for Wedding Photo Locations?
All-in-One Venues
For venues such as Stones of the Yarra Valley or Zonzo Estate, allocating approximately 1–1.5 hours for bridal party and couple portraits is ideal.
Seasonal Considerations
- Winter:
Allow additional buffer time in case the schedule runs behind or daylight becomes limited. - Summer:
Due to daylight saving time, couples often require less time earlier in the day and may also step outside during the reception for sunset portraits.
Off-Site City Photography
If your ceremony and reception are at different venues and you plan to travel into Melbourne for photos, it is best to allow approximately 1–3 hours in total.
This time includes:
- travel between locations
- parking
- walking between photo spots
- traffic delays during peak hours
As a general guide:
- allow 40–60 minutes per location
- avoid planning too many locations within a short timeframe
Trying to visit four or five locations within two hours often becomes rushed and exhausting.
How to Choose Your Wedding Photo Locations
Your ideal locations should reflect:
- your personal style
- your wedding theme
- the atmosphere you want in your photos
- your timeline and budget
Some couples prefer:
- natural scenery and gardens
- historic architecture
- modern city environments
- beaches and coastal views
- creative urban settings
It is also important to consider:
- accessibility
- weather backup options
- permit requirements
- travel time between locations
Popular Wedding Photo Location Styles in Melbourne
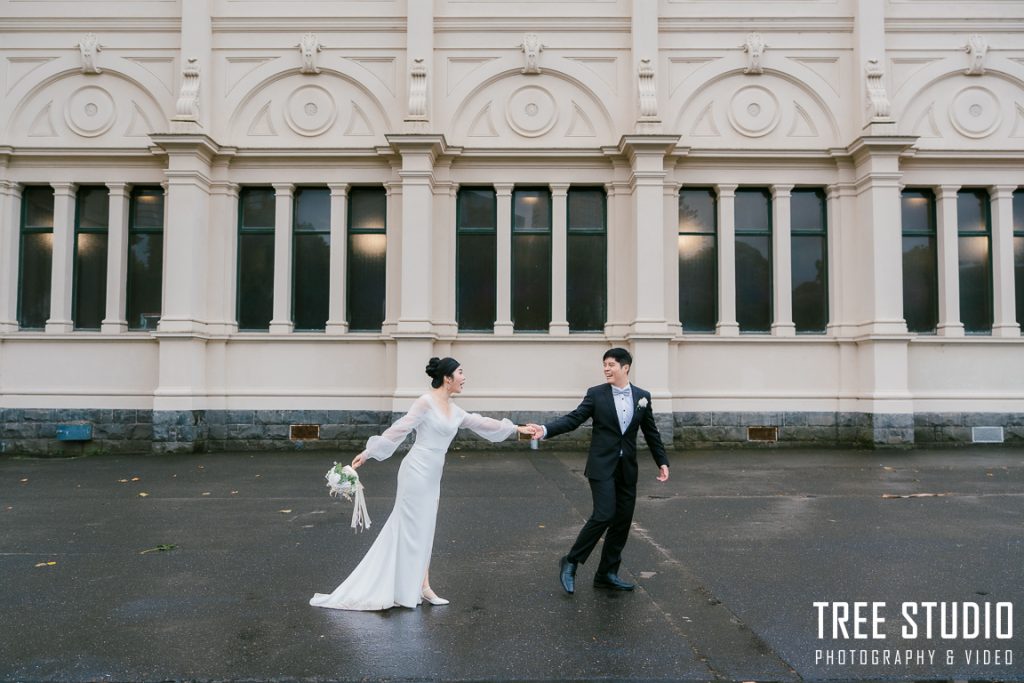
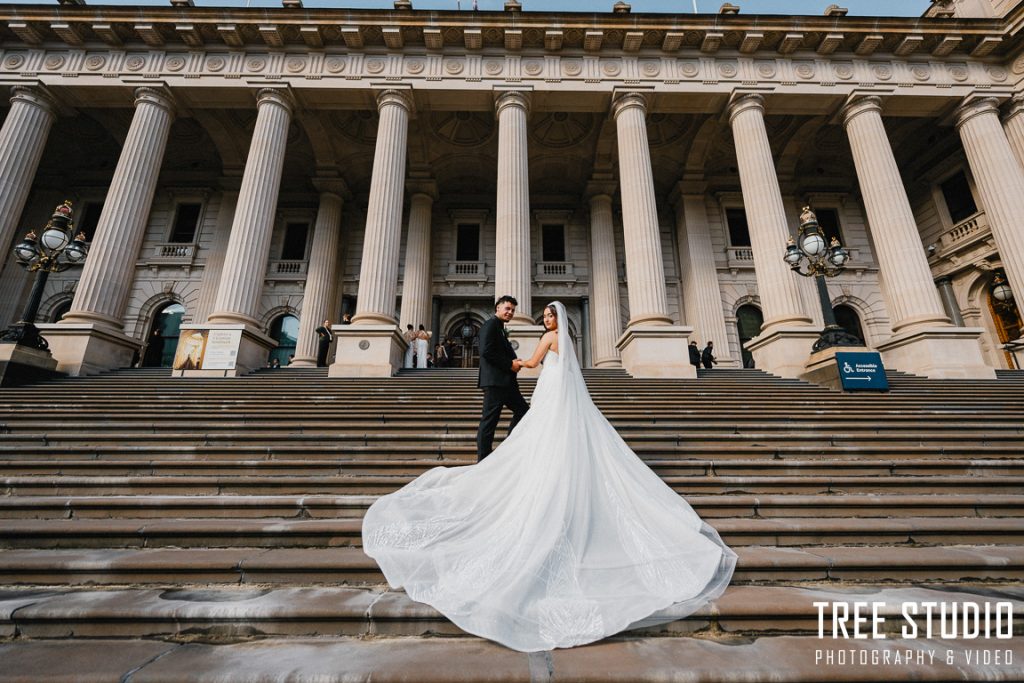
Historic Buildings
Elegant, timeless, and rich in architectural detail.
Popular examples:
- Parliament House Melbourne
- Montsalvat
- State Library Victoria
- Flinders Street Station
- University of Melbourne
- Werribee Mansion
- Labassa Mansion
Contemporary Architecture
Modern, stylish, and visually striking.
Examples:
- Australian Centre for Contemporary Art
- RMIT Design Hub
- Webb Bridge
Gardens
Romantic, natural, and filled with soft light.
Examples:
- Carlton Gardens
- Fitzroy Gardens
- Royal Botanic Gardens Victoria
- Geelong Botanic Gardens
- Williamstown Botanic Gardens
- St Kilda Botanical Gardens
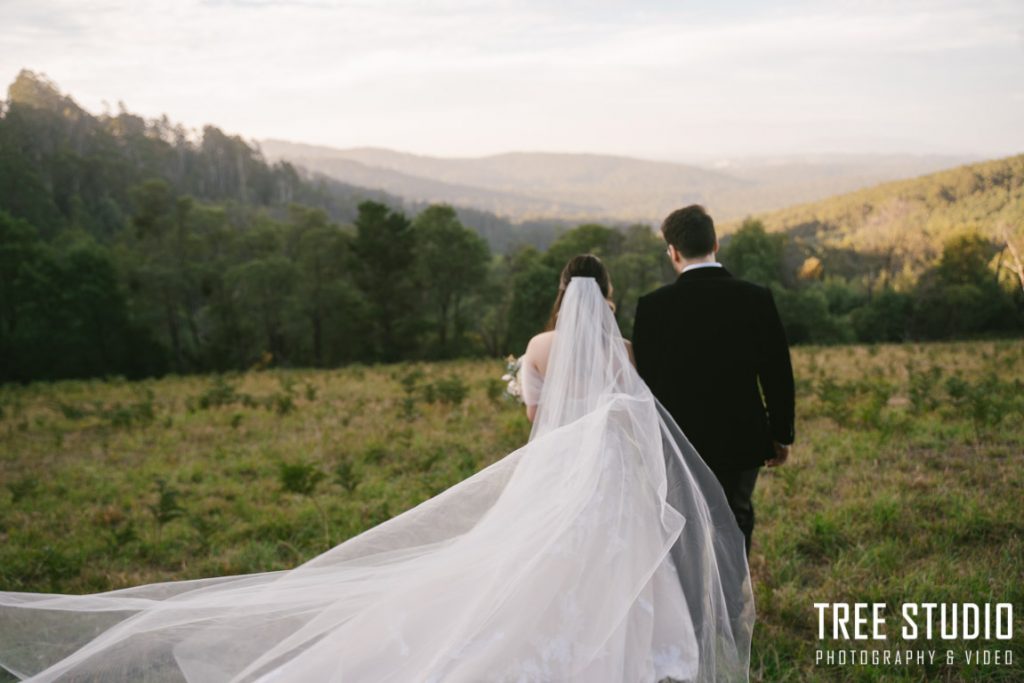
Forests and Woodlands
Natural, atmospheric, and intimate.
Examples:
- Dandenong Ranges
- Cement Creek Redwood Forest
- RJ Hamer Arboretum
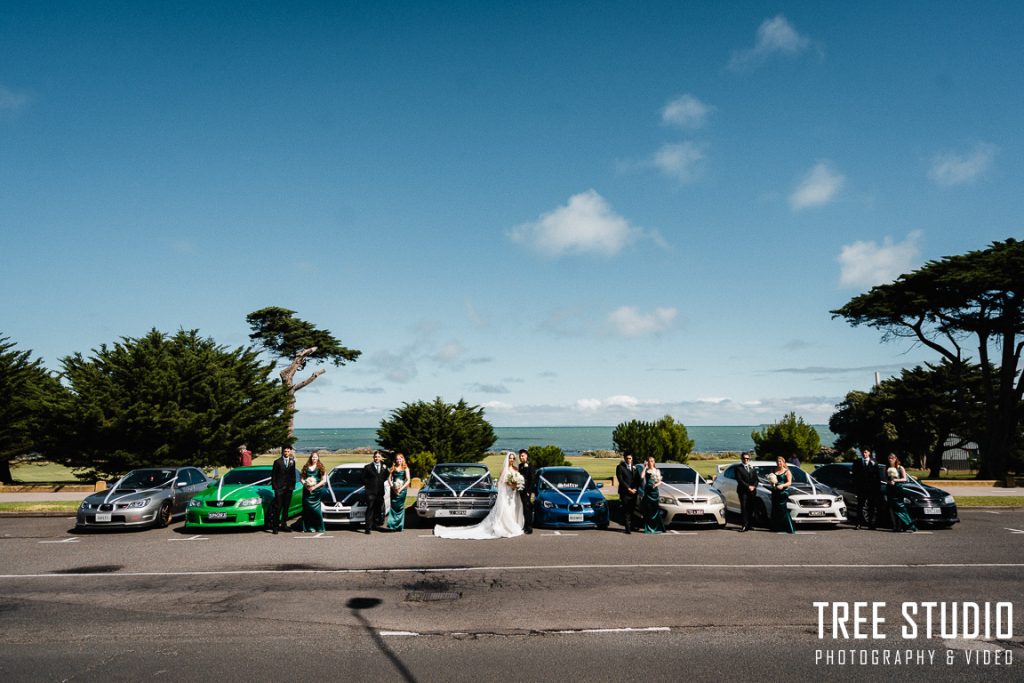
Beaches and Coastal Locations
Open, relaxed, and ideal for sunset photography.
Examples:
- Port Melbourne Beach
- St Kilda Beach
- Mornington Peninsula
- Brighton Beach
- Williamstown Beach
- Geelong Pier
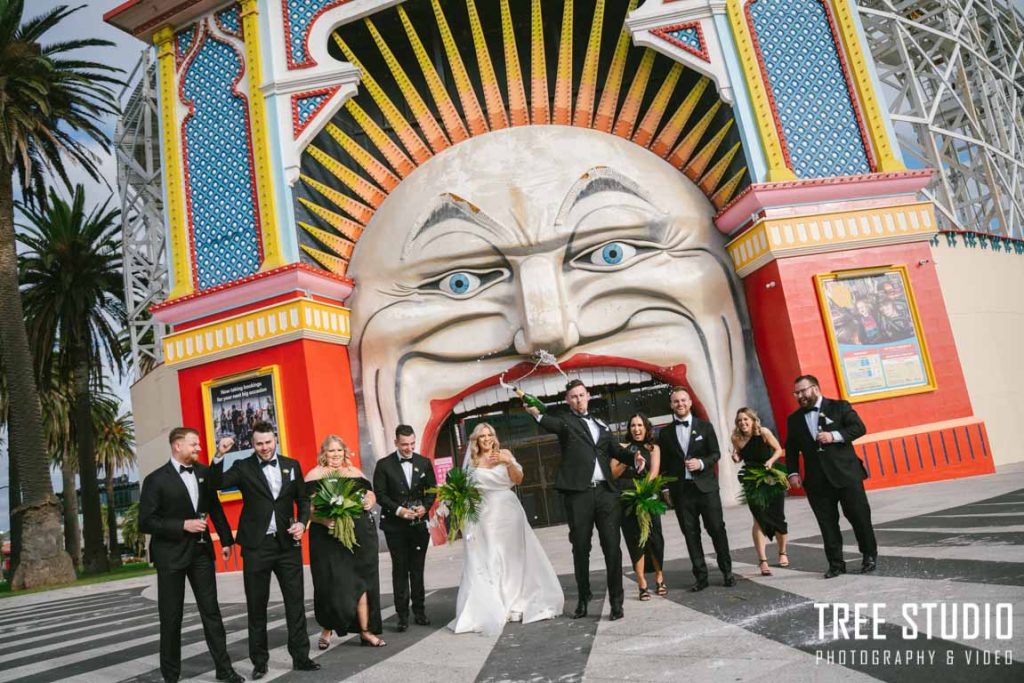
Unique and Creative Locations
Fun, bold, and full of character.
Examples:
- Melbourne Town Hall
- Regent Theatre
- Palais Theatre
- Hosier Lane
- Luna Park Melbourne
- Degraves Street
City Skyline Locations
Perfect for iconic Melbourne skyline portraits.
Examples:
- Southbank Promenade
- Princes Bridge
What If It Rains on the Wedding Day?
Melbourne has many excellent indoor or sheltered photo locations.
Popular wet-weather options include:
- Parliament House Melbourne
- State Library Victoria
- National Gallery of Victoria
- University of Melbourne
Some locations may require permits or prior approval for wedding photography.
How to Look Natural and Elegant in Wedding Photos
Most couples say they prefer wedding photos that feel natural and candid rather than overly posed.
During preparations and ceremonies, photographers can usually capture genuine moments with minimal direction. However, during bridal party and location portraits, gentle guidance helps create timeless and elegant images.
These portraits often become:
- framed wall prints
- album highlights
- large canvas enlargements
- lifelong keepsakes
The Importance of Posture
After photographing many weddings, one thing becomes very clear: posture significantly affects how natural and elegant people appear in photos.
Couples who regularly:
- exercise
- strength train
- dance
- model
- work as personal trainers
often move naturally and photograph effortlessly because they already have strong posture and body awareness.
In contrast, many office workers develop:
- rounded shoulders
- forward head posture
- tight upper back muscles
These habits are extremely common and not usually medical problems, but they can influence how photos look.
An experienced photographer can improve angles and provide small adjustments such as:
- “Open your shoulders slightly”
- “Lift your chest gently”
- “Relax your neck”
However, posture habits developed over many years cannot truly change in a single day.
Preparing Your Posture Before the Wedding
If possible, start posture-focused training around three months before the wedding.
Rather than focusing only on the shoulders, it is better to strengthen:
- upper back muscles
- core stability
- chest mobility
- overall body balance
Consistent gym training can help significantly.
If your budget allows, working with a professional personal trainer may improve posture even faster.
Good posture creates:
- more elegant body lines
- relaxed movement
- natural posing
- timeless portraits
How to Avoid Facial Puffiness Before the Wedding
Facial puffiness can affect close-up portraits, particularly due to temporary water retention.
Two major contributing factors are:
- excessive sodium (salt)
- high refined carbohydrate intake
Physiologically:
- 1 g of stored glycogen binds approximately 3 g of water
- high sodium intake can increase water retention
For approximately 24–48 hours before the wedding, consider reducing:
- salty processed foods
- sugary drinks
- desserts
- excessive refined carbohydrates
Instead, focus on:
- lean protein
- vegetables
- fibre
- healthy fats
- proper hydration
Avoid extreme dieting or dehydration.The goal is simply to reduce unnecessary water retention while maintaining a healthy and balanced appearance.
A healthy body condition almost always helps wedding portraits look cleaner, fresher, and more timeless.
The Guide to a Beautiful Wedding Reception in Melbourne
Once the location shoot is complete, the bridal party can retreat to the bridal suite for a short rest. This is also an ideal opportunity for one of the bridesmaids to do a quick touch-up of the bride’s makeup.
Before guests are seated, the Melbourne wedding photographer can use this time to capture detailed photographs of the reception décor. The shot list will usually include:
- The reception interior
- Flower arrangements, centrepieces, and flower wall
- Wedding dance floor vinyl and custom initials
- Bridal table and table settings
- Wedding cake
- Guest seating chart or welcome board
- Wedding signage and gift box
At more lavish weddings, couples often elevate their reception styling with suspended floral installations, flower walls, hanging wedding cakes, and personalised vinyl dance floors featuring the couple’s initials.
Before the reception begins, I also like to take the couple inside the venue for a few portraits within their beautifully styled setting. I will guide them to stand in the centre of the dance floor, where the bridal table, wedding cake, and floral centrepieces create a stunning backdrop.
Once the reception details have been photographed and guests are seated, the Master of Ceremonies will announce the bridal party’s entrance. Typical wedding reception formalities include:
- Bridal party entrance
- Cake cutting
- First dance
- Speeches
- Father-daughter dance and mother-groom dance
- Bouquet and garter toss
- Bride and groom’s farewell exit
Bridal Party Entrance
The bridal party entrance marks the official beginning of the wedding reception and presents countless opportunities for memorable photographs.
Traditionally, the parents of the bride and groom enter first, followed by the flower girl and page boy. The bridal party then enters in pairs before the Master of Ceremonies invites guests to stand and welcome the newly married couple.
Some traditional weddings, such as Lebanese and Viennese celebrations, feature especially grand entrances. Lebanese weddings often include six to ten drummers who escort the couple into the venue with an energetic performance. Some couples also arrange special effects such as fireworks or cold sparklers, creating spectacular moments for photography.
In some Asian weddings, particularly Chinese weddings, couples may hire lion dancers to perform during their entrance. At large-scale receptions like these, it is common for couples to book two Melbourne wedding photographers to capture the event from multiple angles.
For the remainder of the evening, Melbourne wedding photographers typically work in a documentary style, capturing genuine moments naturally without giving too much direction.
Bridal Waltz
During the bridal waltz, I usually use a wide-angle lens to capture sweeping images of the couple dancing beneath sparkling fireworks or ambient lighting. Shooting from a lower angle helps create a more luxurious and romantic atmosphere.
At the highlight of the first dance, the fireworks often coincide with dramatic moments such as the groom dipping or lifting the bride, creating breathtaking photographs.
Night-Time Melbourne Wedding Photography
Some couples choose to step away during the reception for additional night-time wedding portraits. This can be especially beautiful for rooftop receptions in Melbourne, where the city lights provide a colourful and elegant backdrop.
Many venues also feature fairy lights or decorative draping outdoors, which can be used as soft ambient lighting for romantic evening portraits. Because outdoor areas are often very dark at night, I may use remote lighting to add gentle fill light while maintaining a natural atmosphere.
Night-time Melbourne wedding photography also allows for creative photo opportunities. One of my favourite techniques is incorporating sparklers into the shoot. The warm glow creates a magical and intimate mood that photographs beautifully.
We can even create long-exposure images where the couple uses sparklers to write words such as “Love” in the air.
Bride and Groom Exit
At the end of the reception, the bride and groom will say farewell to their guests. In traditional Italian weddings, guests often form a large circle while the couple hugs and thanks everyone individually. Guests may also create a tunnel for the couple to walk through as they exit the venue.
You Can Have the Perfect Wedding Too
With thoughtful planning and professional photography, your wedding memories can be beautifully captured and preserved for generations to come.
Your perfect wedding story begins with a conversation with a professional Melbourne wedding photographer.
Behind the Scenes of Wedding Photography
Thank you for reading this far. I hope this comprehensive wedding day guide from a Melbourne wedding photographer has helped you better understand how to organize your wedding day and ensure everything runs smoothly. Good preparation is always the best starting point. I recommend reading through this guide carefully and checking that you’ve covered most of the suggestions mentioned here, so you can avoid overlooking important details.
Although I’ve tried to cover most aspects of a wedding day, there are still some topics that I can’t explain in full detail within a single blog post. At the same time, I don’t want couples to feel overwhelmed when they’re simply looking for quick and practical answers. If you’d like to explore certain topics further, you can also read these related guides:
- Top 20 Wedding Photo Locations in Melbourne
- Wedding Day Timeline Guide
- Top 20 Wedding Ceremony Venues in Melbourne
- How to Look Natural and Effortless in Wedding Photos
If you still have any questions regarding your wedding day or wedding photography, please feel free to contact us.